


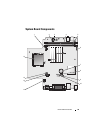


62 Quick Reference Guide
Start the Dell Diagnostics from either your hard drive or from the Drivers and
Utilities media (an optional CD). See "Starting the Dell Diagnostics From
Your Hard Drive" on page 62 or "Starting the Dell Diagnostics From the
Drivers and Utilities CD (Optional)" on page 63 for more information.
Starting the Dell Diagnostics From Your Hard Drive
The Dell Diagnostics is located on a hidden diagnostic utility partition on
your hard drive.
NOTE: If your computer cannot display a screen image, contact Dell.
1
Shut down the computer. Turn on (or restart) your computer.
2
If the computer is connected to a docking device (docked), undock it. See
the documentation that came with your docking device for instructions.
3
Connect the computer to an electrical outlet.
4
Turn on the computer. When the DELL™ logo appears, press <F12>
immediately.
NOTE: If you see a message stating that no diagnostics utility partition has been
found, run the Dell Diagnostics from your optional Drivers and Utilities CD. See
"Using the Drivers and Utilities Media" on page 78 for more information about the
optional Drivers and Utilities CD.
If you wait too long and the operating system logo appears, continue to
wait until you see the Microsoft
®
Windows
®
desktop. Then
shut down
your computer and try again.
5
When the boot device list appears, highlight
DiagnosticsBoot to Utility
Partition
and press <Enter>.
6
Press any key to choose a diagnostic option on your hard drive. The
resulting menu displays:
• Test Memory - this takes you to the MPMemory Diagnostic
• Test System - takes you to the Dell Diagnostic Utility
• Exit - exits Diagnostics
7
Select
Test System
.
8
When the Dell Diagnostics
Main Menu
appears, select the test you want
to run (see "Dell Diagnostics Main Menu" on page 63).