15. After the PowerVault MD3060e Series expansion enclosure is configured as an expansion enclosure of the storage
array, restore the data that was backed up in step 1.
Expanding With New PowerVault MD3060e Expansion Enclosures
Perform the following steps to attach new PowerVault MD3060e expansion enclosures to a PowerVault MD3660i Series
storage array:
1. Before adding the expansion enclosure(s), ensure that the storage array software is installed and is up to date.
For more information, see the Support Matrix at support.dell.com/manuals.
2. Install the software and driver package included on the PowerVault MD Series resource media.
For information about installing the software, see Installing MD Storage Manager.
3. Using MD Storage Manager, update the RAID controller module and NVSRAM firmware to the latest versions
available on support.dell.com.
4. Click Tools → Upgrade RAID Controller Module Firmware from the Enterprise Management Window (EMW).
5. Stop all I/O to the storage array and turn off affected host systems attached to the storage array.
6. Turn off the storage array.
7. Turn off any expansion enclosure(s) in the affected system.
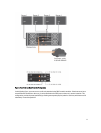
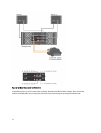
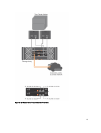
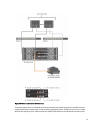
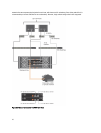
8. Cable the expansion enclosure(s) to the storage array.
9. Turn on the expansion enclosure(s) and wait for the enclosure status LED to turn blue.
10. Turn on the storage array and wait for the status LED to indicate that the unit is ready:
– When power is on, the power on indicator lights solid green.
– If the Service action required indicator lights amber, there is an error that can be viewed using the
PowerVault Modular Disk Storage Manager.
11. After the storage array is online and ready, turn on any attached host systems.
12. Using PowerVault MD Storage Manager, update all attached expansion enclosure firmware if it is out of date.
13. From the EMW, select the enclosure that you want to update and launch the Array Management Window (AMW).
14. Select Upgrade → EMM Firmware.
15. Click Select All to update all the attached expansion enclosures simultaneously.
16. Click Start.
18


