


CAUTION: If you are using the Trusted Program Module (TPM) with an encryption key, you may be prompted to
create a recovery key during program or system setup. Be sure to create and safely store this recovery key. If you
replace this system board, you must supply the recovery key when you restart your system or program before you
can access the encrypted data on your hard drives.
1. Turn off the system, including any attached peripherals, and disconnect the system from the electrical outlet.
2. If installed, remove the front bezel.
3. Open the system.
4. Disconnect the cables to the system board, SAS backplane, control panel board, and the (if applicable) optical
drive.
5. Remove the following:
a) cooling shroud/processor expansion module
b) memory modules
c) cooling fan assembly
d) power supply(s)
e) expansion-card risers, expansion card(s)/integrated storage controller card
WARNING: The heat sink is hot to touch for some time after the system has been powered down. Ensure
that you do not touch the heat sink(s) while removing the system board.
f) heat sinks/processors
g) network daughter card
h) internal dual SD module
i) internal USB key (if installed)
6. Disconnect all cables from the system board.
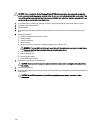
CAUTION: Take care not to damage the system identification button while removing the system board from
the chassis.
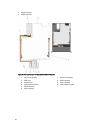
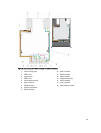
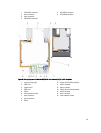
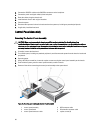
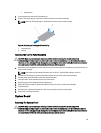
7. Loosen the thumb screw.
8. Grasp the system-board holder, slide the system board toward the front of the system, and lift the system board out
of the chassis.
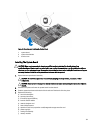
CAUTION: Do not lift the system board assembly by grasping a memory module, processor, or other
components.
100