


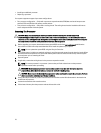


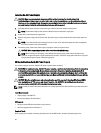
6. With the release levers on the processor socket in the open position, align pin 1 of the processor, using pin 1
position guide on the socket, as reference and set the processor lightly in the socket.
CAUTION: Do not use force to seat the processor. When the processor is positioned correctly, it engages
easily into the socket.
7. Close the processor shield.
8. Rotate the socket-release lever near the lock icon until it is locked in position.
9. Similarly, rotate the socket-release lever near the unlock icon until it is locked in position.
10. Using a clean lint-free cloth, remove the thermal grease from the heat sink.
CAUTION: Applying too much thermal grease can result in excess grease coming in contact with and
contaminating the processor socket.
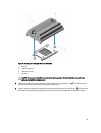
11. Open the grease applicator included with your processor kit and apply all of the thermal grease in the applicator to
the center of the topside of the new processor.
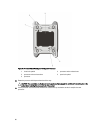
12. Place the heat sink on the processor. Ensure the beveled side of the heatsink is toward the lock icon on the
processor.
13. Using a #2 Phillips screwdriver, tighten the heat-sink retention sockets.
14. If applicable, install the cooling shroud or the processor expansion module.
15. Close the system.
16. Reconnect your system and peripherals to their electrical outlets, and turn on the system.
17. Press <F2> to enter the System Setup and check that the processor information matches the new system
configuration.
18. Run the system diagnostics to verify that the new processor operates correctly. See Using System Diagnostics for
available diagnostic tests.
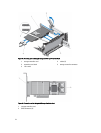
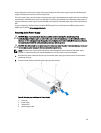
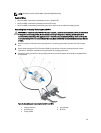
Power Supplies
Your system supports either:
• Two 750 W or 1100 W AC power supply modules
• Two 750 W Titanium efficiency power supply modules
• Two 1100 W DC power supply modules
NOTE: Titanium power supply is nominally rated for 200 VAC to 240 VAC input only.
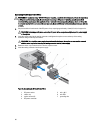
When two identical power supplies are installed, the power supply configuration is redundant (1 + 1). In redundant
mode, power is supplied to the system equally from both power supplies to maximize efficiency.
When only one power supply is installed, the power supply configuration is non-redundant (1 + 0). Power is supplied to
the system only by the single power supply.
NOTE: If two power supplies are used, they must be of the same type and have the same maximum output power.
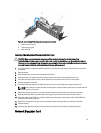
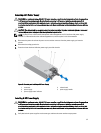
Hot Spare Feature
Your system supports the Hot Spare feature that significantly reduces the power overhead associated with power
supply redundancy.
When the Hot Spare feature is enabled, a redundant power supply is switched to a sleep state. The active power supply
supports 100% of the load, thus operating at higher efficiency. The redundant power supply in the sleep state monitors
82