


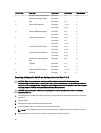

Card Priority Card Type Form Factor Slot Priority Max Allowed
1 Internal Storage (Integrated Slot) Full Height 7, 2 2
PCIE Extender Adapter (SSD) Full Height 1 1
2 GPU Full Height 1, 6 2
3 External SAS Controllers Full Height 7, 2, 1, 6 2
Low Profile 3, 4, 5 3
3 Converged Network Adapters Full Height 6, 2, 1 3
Low Profile 3, 4, 5 2
4 10 Gb Ethernet Controllers Full Height 6, 2, 1 3
Low Profile 3, 4 2
Low Profile 3, 4, 5 2
5 Fibre Channel 8 Gb Dual Port Full Height 6, 2, 1 3
Low Profile 3, 4, 5 2
6 Fibre Channel 8 Gb Single Port Full Height 6, 2, 1 3
Low Profile 3, 4, 5 3
7 Fibre Channel 4 Gb Single/Dual
Port
Full Height 6, 2, 1 3
8 1 Gb NICs Low Profile 3, 4 2
Full Height 6, 2, 1 3
9 External Non-RAID Controller Full Height 7, 2, 1, 6 3
10 Fusion I/O Full Height 2, 6 2
Removing An Expansion Card From An Expansion-Card Riser 1 Or 2
CAUTION: Many repairs may only be done by a certified service technician. You should only perform
troubleshooting and simple repairs as authorized in your product documentation, or as directed by the online or
telephone service and support team. Damage due to servicing that is not authorized by Dell is not covered by your
warranty. Read and follow the safety instructions that came with the product.
CAUTION: Remove any power cables and externally powered devices from the system before removing an
expansion-card riser.
1. Turn off the system, including any attached peripherals, and disconnect the system from the electrical outlet and
peripherals.
2. Open the system.
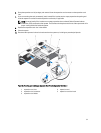
3. Disconnect any cables connected to the expansion card.
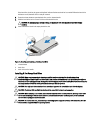
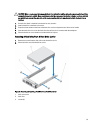
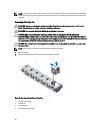
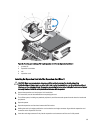
4. Lift the expansion-card riser out of the chassis using the touch points.
NOTE: For a full-height expansion card, pull the expansion-card holder away from the expansion-card riser.
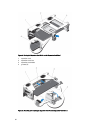
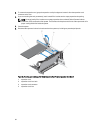
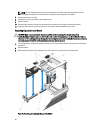
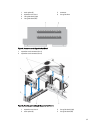
5. Press the expansion-card riser latch and rotate it away from the expansion card riser.
60