


Replacing the Graphics Card | 29
Replacing the Graphics Card
WARNING: Before working inside your computer, read the safety information
that shipped with your computer and follow the steps in "Before You Begin" on
page 9. After working inside your computer, follow the instructions in "After
Working Inside Your Computer" on page 11. For additional safety best practices
information, see the Regulatory Compliance Homepage at
dell.com/regulatory_compliance.
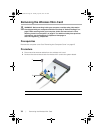
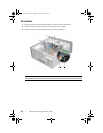
Procedure
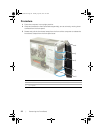
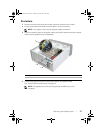
1 Align the graphics card with the PCI-Express x16 card connector on the system
board.
2 Place the card in the connector and press down firmly. Ensure that the card is firmly
seated in the slot.
3 Connect the power cable to the graphics card, if applicable.
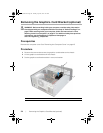
4 Replace the card-retention bracket, ensuring that:
• The guide clamp is aligned with the guide notch.
• The top of all cards and filler brackets are flush with the alignment bar.
• The notch on top of the card or filler bracket fits around the alignment guide.
5 Replace the screw that secures the card-retention bracket.
Postrequisites
1 Replace the graphics-card bracket, if applicable. See "Replacing the Graphics-Card
Bracket (optional)" on page 25.
2 Replace the computer cover. See "Replacing the Computer Cover" on page 16.
OM_Book.book Page 29 Tuesday, April 30, 2013 6:07 PM