


10/100 Fast Ethernet Switch User’s Guide
Unpacking and Setup
9
♦ Drill two holes into the wall with the same distance as the screw
support holes located on the bottom of the Switch. Do not drill these
holes too deep.
♦ Insert the plastic anchors into the holes in the wall and secure them
with gentle taps of a hammer.
♦ Screw in the screws provided with the wall mount kit into the plastic
anchors. Do not insert the screws with excessive torque. Note that
the screw’s head along with a small portion of the screw’s body
should be sticking out.
♦ Gently, place the Switch onto the wall with the front panel facing up
or down by sliding the screws into the provided slots.
♦ Make all power and network connections at this time, see Connecting
the Switch.
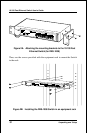
Rack Installation (DES-1008)
The DES-1008 can be mounted in an EIA standard size, 19-inch rack, which
can be placed in a wiring closet with other equipment. The mounting
brackets for the DES-1008 are an optional item and must be purchased
separately from your local re-seller. To install, attach the mounting
brackets on the switch’s front panel (one on each side) and secure them with
the screws provided.