


10/100 Auto Negotiation Switch User’s Guide
Installing the DES-3216
6
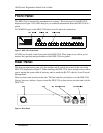
2. Install the DES-3216 on the desktop/shelf where you would like to place it.
Rack Installation
The DES-3216 can be mounted in an EIA standard size, 19 inch rack. The dimensions of the
DES-3216 are 17.4 x 10.4 x 3.2 inches. The DES-3216 can be placed in a wiring closet along
with other equipment.
Follow these steps to install the DES-3216 on a rack:
1. Attach a mounting bracket to each side of the DES-3216 with the screws provided.
2. Slide the DES-3216 into the rack and use the screws provided to secure the DES-3216 to
the rack.
3. Connect the power cord and verify that the DES-3216 is receiving adequate power.
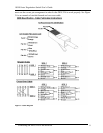
Power On
The power supply will adjust to the local power source automatically. The DES-3216 may be
plugged in without having any or with all LAN segment cables connected.
The power plug is located at the rear of the DES-3216. Plug the cable into the wall socket
and plug the other end into the DES-3216. There is a power on/ off switch located at the rear
of the DES-3216. Move the switch to the on position to power the DES-3216 on. The Power
LED will light and all ports will auto negotiate the proper speed and duplex mode when the
DES-3216 is powered on.
Reboot the DES-3216 if there is a problem. Contact D-Link Systems, Inc. for technical
support.
Check the configuration of the DES-3216 after a power failure but do not reset unless it is
necessary.
The DES-3216 can be used with power sources in the range 100 to 240 VAC., 50 to 60 Hz.