DSL-500T ADSL Router User’s Guide
19
Configure Connection 1 for PPPoA
PPP or Point-to-Point protocol is a standard method of establishing a network connection/session between
networked devices. Different forms of PPP include PPPoA and PPPoE (discussed below) involve an
authentication process that requires a username and password to gain access to the network. PPPoA (PPP over
ATM) as described in RFC 2364, is a method of using PPP on an ATM network. ATM is used for many types of
telecommunications services including ADSL.
To configure the WAN connection for PPPoA, perform the steps listed below. Some of the settings do not need
to be changed the first time the device is set up, but can be changed later if you choose.
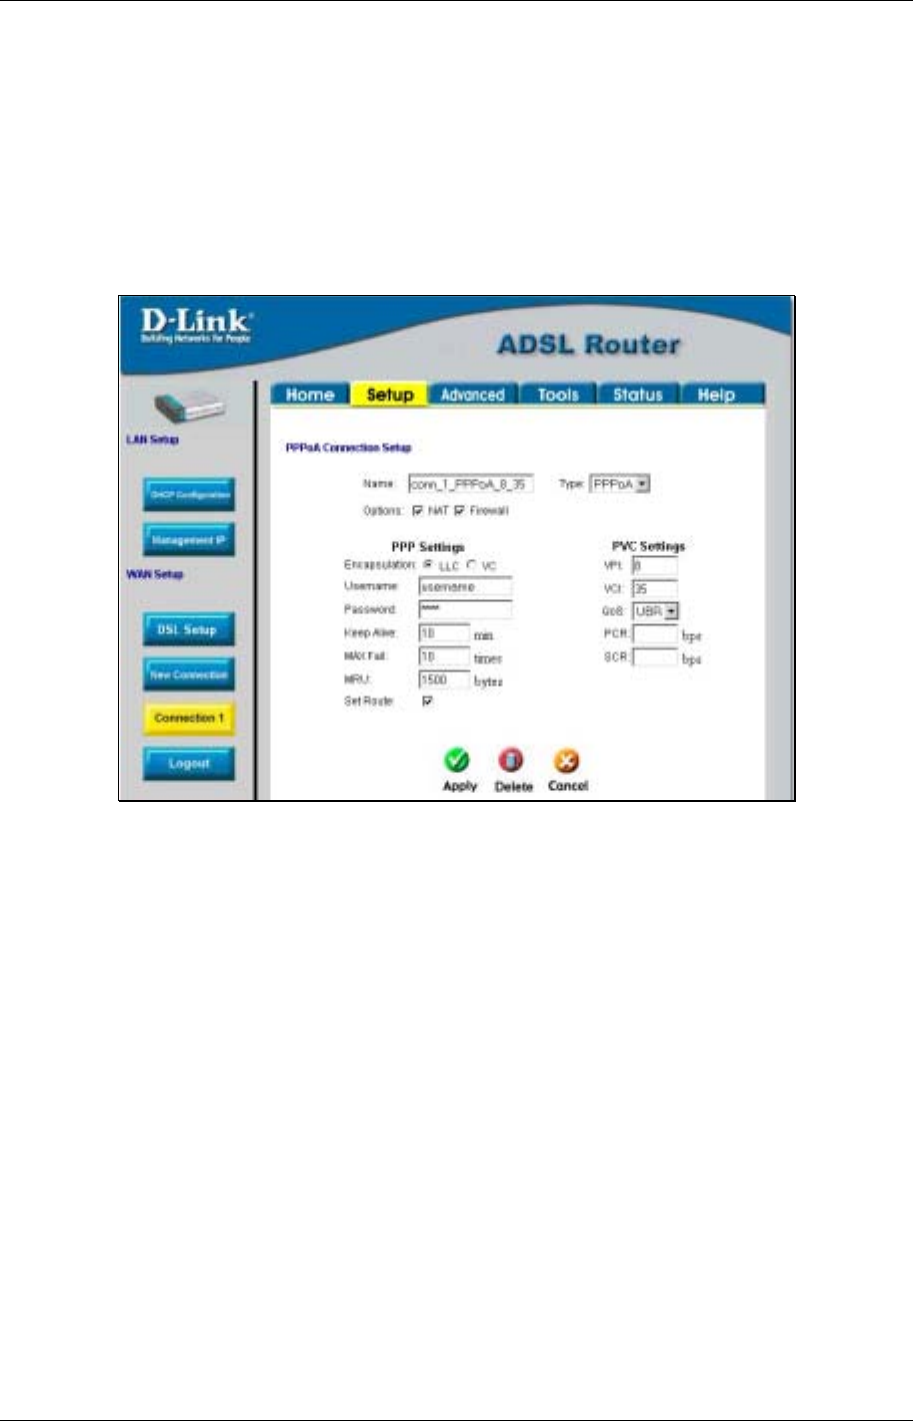
Figure 3- 5. PPPoA Connection 1 Setup menu
To configure the default connection type (PPPoA) for Connection 1, follow the steps listed below. To change the
connection type of Connection 1 to an alternative type follow the instructions according to the desired type as
described below in Change the Connection Type.
1. Click the Connection 1 button under WAN Setup to view the PPPoA Connection Setup menu
pictured in the example above.
2. Type in a Name for the connection or use the default name conn_1_PPPoA_8_35 in the space provided.
3. Under Options, enable NAT and/or Firewall by selecting the corresponding selection box.
4. If you are told to change the VPI or VCI values, type in the values given to you by your service
provider. Many users will be able to use the default settings.
5. Leave the default QoS values if you are unsure or the ISP did not provide this information.
6. Do not change the PCR or SCR values unless you are required to do so. If you are told to change these,
type in the values given to you by your service provider.
7. Type the Username and Password used to verify the identity of your account. Typically, the Username
is an account number assigned by your ISP and appears in the form account#@serviceprovider.com,
while the Password may have been chosen by the account holder. For most users, the remaining settings
will not need to be changed. See your ISP for further information.
8. Click the Apply button when you have entered all the information. The web browser will briefly go
blank. You are now finished changing setting for the primary WAN connection known as Connection 1.
It is now necessary to save the changes you just made and restart the Router.


