


10-4
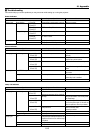
Does not turn on
No picture
Image isn’t square to the
screen
Picture is blurred
Image is scrolling verti-
cally, horizontally or
both
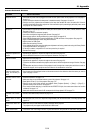
Remote control does
not work
Indicator is lit or blink-
ing
Cross color in RGB
mode
USB mouse does not
work
No on-screen menu
• Check that the power cable is plugged in and that the main power switch on the projector is on. See pages 1-
9 and 2-11.
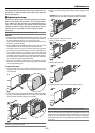
• Ensure that the lens hood or the lamp cover is installed correctly. See pages 1-4 and 9-2.
• Check to see if the projector has overheated or the lamp has reached the end of its usable life. If there is
insufficient ventilation around the projector or if the room where you’re presenting is particularly warm, move
the projector to a cooler location.
• Use the menu or Source/Input button to select your source (RGB 1/2, DVI, Video, S-Video, Viewer or LAN).
See page 3-3 or 8-7.
• Ensure your cables are connected properly.
• Use menus to adjust the brightness and contrast. See page 8-8.
• Select correct option in the Signal Select for current signal. See page 8-16.
• Select RGB/Component when connecting DVD player to RGB connector of the projector. See page 8-11.
• Apply a standard RGB signal when using RGB connector.
• Adjust picture for RGB signal.
• Make sure each setting is correct.
• If the problem still persists, reset the settings or adjustments to factory preset levels using the Factory Default
in the Adjustment Menu. See page 8-13.
• If Security is enabled, a keyword or PC card as a protect key is required.
• Remove the lens cap.
• Reposition the projector to improve its angle to the screen. See page 3-3.
• Use the 3DReform function to correct the trapezoid distortion. See page 3-4.
• Adjust the focus. See page 3-4.
• Reposition the projector to improve its angle to the screen. See page 3-3.
• Ensure that the distance between the projector and screen is within the adjustment range of the lens. See page
2-2.
• Condensation may form on the lens if the projector is cold, brought into a warm place and is then turned on.
Should this happen, let the projector stand until there is no condensation on the lens.
• Use the menus or Source/Input button on the remote control or the cabinet to select the source you want to
input. See page 3-3 or 8-7.
• Install new batteries. See page 1-12.
• Make sure there are no obstacles between you and the projector. See page 1-12.
• Stand within 22 feet (7 m) of the projector. See page 1-12.
• Check if one or more remote sensors are enabled. Select [Projector Options] → [Setup] → [Page 5] →
[Remote Sensor] from the menu. See page 8-17.
• If the remote control cable plug is inserted into the REMOTE 2 IN jack, the remote control does not function
wirelessly. See page 1-13.
• Make sure that the remote control’s ID corresponds with the projector’s ID. See page 7-2.
• See the Power/Status/Lamp Indicator on page 10-3.
• If Auto Adjust is off, turn it on or adjust the image manually with the Position/Clock in the Image Options. See
page 8-16.
• Make sure that your USB mouse is properly connected to the projector.
The projector may not support some brands of a USB mouse.
• Press MUTE OSD if the image is muted. Or press and hold CTL and press MUTE OSD button. See page 4-2.
Problem Check These Items
Common Problems & Solutions
10. Appendix