


2-6
2
c Optional Lens Installation
This section describes how to install the lens.
Before installation
* Determine the optional lens to be used to obtain a desired projection distance. There are six optional lenses available:
GT13ZLB, GT19ZL, GT20ZL, GT24ZLB and GT34ZLB (Zoom lens)
GT10RLB (Short throw fixed-focus lens)
* Press the power button (ON/STAND BY) on the projector or POWER OFF button on the remote control for a minimum of two seconds to turn off the
power, wait 90 seconds (2 minutes in the optional extended life lamp) for the cooling fan to stop, turn off the main power switch then
disconnect the power cable.
Check that the projector has cooled off sufficiently before proceeding.
CAUTION
* The projector and lens contain high-precision parts. Do not induce shock to the projector or the lens.
* Do not touch the lens surface. Doing so can degrade the optical performance.
Preparation: Tools needed for installation:
A hexagonal driver and dust-protective sheets are supplied with the optional lens.
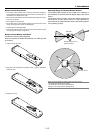
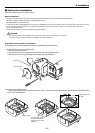
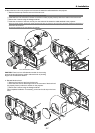
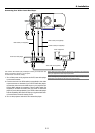
1. Remove the lens hood cap and lens hood.
q Remove the lens hood cap.
w Loosen and remove the 2 screws on the lens hood using the hexagonal driver.
e Remove the lens hood by pushing down and pulling the top toward you.
P
C
C
A
R
D
P
C
C
O
N
T
R
OL
IN
IN
O
U
T
O
U
T
S
C
TR
IG
G
E
R
R
E
M
O
T
E
2
R
E
M
O
T
E
1
L
A
N
A
C
IN
U
S
B
(
M
O
U
SE/HU
B
)
U
S
B
(
P
C
)
2
1
B
/C
b
V
H
/
H
V
R
L
/
M
O
N
O
R
L
/
M
O
N
O
S
-VIDEO
1
2
3
3
Lens hood
Lens hood cap
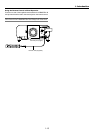
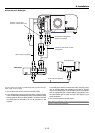
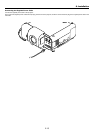
2. Attach a dust-protective sheet.
q Remove the shipping tape on the back of the lens hood. w Insert the dust-protective sheet included with your optional lens. Be
careful not to fold the sheet.
1
Insert the dust-protec-
tive sheet with the alu-
minum side up while
bending it.
Shipping tape
2. Installation
Hole
Align the holes on
the right.