


11
Creating Multi-Line Labels
The number of lines you can print on a label depends
on the width of the label you are using:
• Maximum of five lines on 3/4" (19 mm) and 1”
(24 mm) labels
• Maximum of three lines on 3/8" (9 mm) and 1/2"
(12 mm) labels
• Maximum of one line on 1/4" (6 mm) labels
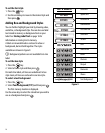
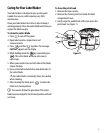
To create a multi-line label
1. Type the text for the first line, and press Enter. A
new line character is placed at the end of
the first line in the display, but will not print on
the label.
2. Type the text for the second line.
The display shows the line on which you are currently
entering text. The example below indicates that the
second line is the current line on the label.
Use the arrow keys to move between lines.
Using Mixed Formats
You can apply different fonts and format styles to the
text on a label by inserting format breaks to divide the
label into blocks or sections of text. Each section is
separated by a format break. You can add two format
breaks, allowing you to apply three separate formats
to a label.
Alignment, underline, box styles, and background
patterns cannot be mixed on a label.These styles are
common to the entire label.
To add a format break
1. Enter and format text for the first section.
2. Press .
3. Select Insert Format Break and press .
4. Continue entering and formatting text for the next
section of the label.
Using Tabs
You can add tabs to a label to align text on multi-line
labels. Tabs are left justified and the default spacing
is 2.0” (50 mm).
To change the tab spacing
1. Press .
2. Select Set Tab Length and press .
3. Use the up and down arrow keys to increase or
decrease the tab setting, and then press .
To insert a tab
1. Enter your text.
2. Press the key and continue entering text.
Insert
Preview
Settings