


normal display.
How to lock Auto-numbering
To prevent the counter from automatically
advancing to the next sequential number after
each printing, press the LOCK button. The
CNTLOCK indicator will appear on the LCD. To
deactivate, press the LOCK button again and
the CNTLOCK indicator will disappear.
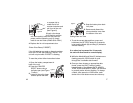
Alarm Function
Setting the Alarm
1. Press the ALARM MODE button. The Alarm
indicator will start flashing.
2. Press LOCK to activate the alarm icon
(bell will appear).
3. Press SET/EDIT while the alarm indicator is
still flashing and hour digit will begin to flash.
4. Press LOCK to set hour, once the hour is set
press SHIFT and press LOCK to set the
minute.
5. Press the ALARM MODE button to lock-in
the alarm setting.
NOTE: When alarm sounds, the Date/Time
11
pattern press the ALARM MODE button to
finish print programming and return to normal
display.
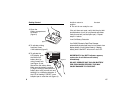
Auto-numbering
Your Date/Time Stamper allows you to use either
4 or 6 digit auto numbering Follow the
instructions below for setup:
1. Press and hold the PRINT SELECT button for
2 seconds, the DATE field will start flashing.
2. Press the PRINT SELECT button until either 4
or 6-digit auto-numbering is flashing and use
the SET/EDIT button to turn the rectangle on.
3. Press the LOCK button to set the first digit.
Once the first digit is set, press the SHIFT
button and once again press the LOCK button
to set the second digit. Follow this pattern until
all digits are correct.
If you chose 4-digit auto numbering, the counter
will only count up. If you chose 6-digit auto
numbering you can have the stamper count up or
down, depending on the arrow that was flashing
when you selected 6-digit auto numbering.
4. Press the ALARM MODE button to return to
10