


8
Printing Labels with DYMO Label™ v.8 Software
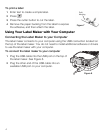
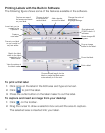
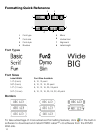
The following figure shows some of the major features available in DYMO Label v.8.
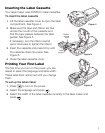
To print your first label
1 Click in the built-in software to start DYMO Label v.8 software.
The first time you start DYMO Label software, a list of available label types is
displayed on the left side of the window and a blank label is displayed in the
Edit area.
2 From the Labels tab, select a tape label and then select a layout.
Make sure that the width of the tape label you select matches the width of
the label cassette loaded in the label maker.
3 Click once on the tape label in the Edit area and type some text.
4 Click to print the label.
For complete details on using the software, refer to the online Help.
Insert text,
addresses,
images,
shapes, lines,
barcodes,
dates, and
counters.
Apply a layout to
a label.
Store your
favorite
addresses or
other data in the
Address Book;
automatically
insert the data
on your label.
Visually
choose your
label type and
apply layouts.
Select a label
maker to print
your labels.
Print a label.
Capture an area of the screen
and insert on your label.