


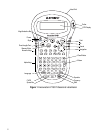
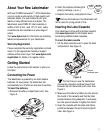


7
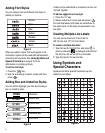
Adding Symbols
The labelmaker supports the extended symbol set
as shown in Figure 9.
To add a symbol
1. Press . The first row of symbols shown in
the table appears in the display.
2. Use the arrow keys to move to the desired
symbol. The left and right arrows move
horizontally along a row of symbols. The up and
down arrow keys scroll vertically through the
rows of symbols.
To quickly see a row of symbols, you can press
the letter corresponding to the row you want.
3. When you locate the symbol, press to add
the symbol to your label text.
Adding International Characters
The labelmaker supports the extended Latin
character set using RACE technology. Similar to
using a mobile phone keypad, if you type a letter
multiple times within a very short time, you will
scroll through variations on that letter.
For example, if French is selected as the language
and you repeatedly press the letter a, you will see
a à â æ and so on through all the variations
available. The character variations and the order in
which the variations appear depend on the
language you have selected to use.
Currency Symbols
The currency key $ also uses RACE to scroll
through a number of currency symbols:
€ £ $ ¢ ¥
The order these symbols appear depends on the
language you have selected.
Printing Options
You can print multiple copies of a label at one time,
print fixed-length labels, review label text and
format, and adjust the printing contrast.
Printing Multiple Copies
You can print up to 16 copies of a label at one time.
When printing multiple copies, a dotted cut-line is
printed between each label.
To print multiple copies of the label
1. Press .
2. Select Set # Copies and press .
3. Use the arrow keys to set the desired number of
copies to print and press .
4. Press to begin printing.
When printing is finished, the number of copies to
print returns to the default value of 1.
Printing a Fixed-Length Label
Normally, the length of the label is determined by
the length of the text entered. However, you may
wish to make a label for a specific purpose that is a
fixed length regardless of the length of the text.
You can specify a fixed length for a label in 0.1”
(2 mm) increments between 1.5” (40 mm) and
15.0” (400 mm). The preset fixed length is 4.0”
(100 mm). Any change you make to the fixed
length setting remains in effect until you change it.
To set the label length
1. Press + .
2. Select ON to turn on Fixed Length, then press
.
3. Press the up arrow to increase the length.
4. Press the down arrow to decrease the length.
5. Press to set the fixed length.
6. After printing the label, repeat step 1 and turn
Fixed Length OFF; otherwise, all subsequent
labels will print with this fixed length.
Symbols