


Setting up your hard drive enclosure
3
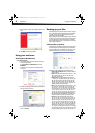
DX-PHD25
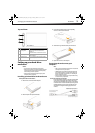
Top and Front
Setting up your hard drive
enclosure
Cautions:
• Use only the accessories provided in the accessory package.
• Make sure that you first touch an unpainted, grounded metal object
to discharge any static electricity stored on your clothing or body
before touching any electronic components.
• Handle the printed circuit board (PCB) by the edges only. Avoid
touching the electronic components.
Installing your hard drive in the enclosure
To install your hard drive in the enclosure:
1 Remove the two screws from the left side panel.
2 Remove the plastic end cap and circuit board.
3 Connect the drive’s data connector to the corresponding
connector on the enclosure circuit board.
4 Slide the drive tray, with drive attached, into the enclosure.
5 Replace the two screws on the side panel.
Connecting the enclosure to your
computer
Notes:
• Make sure you have installed the hard drive into the enclosure before
connecting the enclosure to your computer.
•A new hard drive must be initialized and partitioned before it will
appear in Windows Explorer or on your Mac desktop. Refer to your
hard drive manufacturer’s documentation, or see “Formatting the
hard drive in Windows” on page 4.
• Connect the hard drive enclosure to your computer before inserting
the software CD into your optical drive.
To connect the enclosure to your computer:
• Connect the Mini B type connector on the USB Y cable (provided)
to the enclosure, then plug the other end of the cable to your
computer. Connect both USB-A type connectors to the computer
to make sure that the enclosure has sufficient power. A good rule
of thumb would be to use one connector initially, then if your
computer does not recognize the drive, plug in the second
connector.
# Item Description
1
Activity LED LED turns on when the hard drive is
turned on.
LED blinks when the hard drive is active.
2
USB 2.0 port Connect a USB cable to this port and to
your computer.
3
Backup button Press to initiate backup of selected files
on your computer.
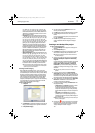
2.5” PATA hard drive
Additional USB 2.0 A type male connector
for additional power (use if required)
USB 2.0 A type male connector
for data and bus power
USB 2.0 Mini B type male
connector for data and bus power
11-0170_DX-PHD25_MAN_ENG_V1.fm Page 3 Thursday, March 17, 2011 11:51 AM