


8
Backing up your filesDX-PHD25
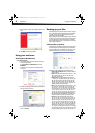
To save your project, click Save. Enter a name for the project,
then click OK. If you decided to run the project now, a progress
screen will inform you when the project has been completed.
9 Click Done to return to the project window.
Note: Scheduled projects must be saved before they can be run.
To open and run a saved Backup Files project:
1 Click File. If the project is listed on the File menu, select it. If the
project is not listed, click Open and use the dialog box to
navigate to the project file. By default, project files are saved in
your Windows Vista and Windows 7 Documents folder or
Windows XP My Documents folder. The settings for that project
are displayed in the project window.
2 Change the project settings as needed. Click Save to save your
changes. (If you save the project without changing its name, the
original project is overwritten.)
3 If necessary, insert a blank or rewritable disc into the selected
destination drive.
4 Click the action button to begin recording.
A progress screen informs you when the project has been
completed.
Using the Backup Files scheduler
Each time you create a Backup Files project, you have the option of
running it immediately or scheduling the project to run at a regular
interval that you choose.
To schedule a Backup Files project:
1 Open the Backup Files project.
2 Set up a new project or select a saved project. See "Creating a
new Backup Files project" on page 7 for more information on
starting a project.
3 Choose one of the scheduling options in the project window:
• Run now-The project runs after you click the action button.
• Daily-The project runs every day at the time the project was
created.
• Weekly-The project runs once a week at the time and on the
day of the week the project was created.
• Monthly-The project runs once a month at the time and on
the day of the month the project was created.
4 Save your project by clicking Save. A save window appears.
5 Name the project, then click OK.
Note: If you schedule a monthly backup for the 31st day of the month,
your backup will be skipped during months with fewer than 31 days.
Backups scheduled on the 29th or 30th day of the month will also be
skipped during some months.
Scheduler tips
The following tips will help you to better understand the scheduler:
• Scheduled projects must be saved before they can be run.
• Keep the following limitations in mind if you want a scheduled
project to be completed successfully while you are away from
your computer:
• Backup Files will not overwrite files without your permission.
This usually involves clicking on a series of message boxes. To
perform an unattended archive project, you may need to
change the hard drive destination for your archived files or
archive your files to a disc.
• If you are archiving files onto a disc, a blank disc must be
inserted in your drive when the project starts.
• Some of the energy conservation settings available for your
computer may keep a scheduled project from starting even if
the project launcher is open.
• The Backup Files project uses a scheduler that is part of the
Windows operating system. A system administrator has the
ability to prevent a computer user from using the scheduler or
running scheduled projects. If the Backup Files scheduler does
not work as expected, consult your system administrator.
• You can use your Windows scheduling software to customize
when your saved projects run. You can schedule a project to run
twice a week or once every hour. Save your project, then edit the
schedule using the Windows Scheduler.
To run Windows Scheduler in Windows XP, click Start, All Programs,
Accessories, System Tools, Scheduled Tasks.
To run Windows Scheduler in Windows Vista and Windows 7, click
Start, All Programs, Accessories, System Tools, Task Scheduler.
Note: See Windows Help and Support for information on using the
Windows Scheduler. Remember that scheduling changes made
directly in the Windows Scheduler are not displayed in the Backup Files
project window.
Backup tips
• All of the discs used in a Back Up Files project must be the same
general format.
• In a multi-disc Back Up Files project, files are assigned based on
the size of the first disc you use. If your first disc has a capacity of
650 MB, for example, no more than 650 MB will be burned on
any subsequent disc, even if it has a larger capacity. This also
means that no disc in a project can have a smaller capacity than
the first disc used in a project.
• Discs used in a Back Up Files project are closed once they are
recorded. If you use write-once discs, you will not be able to add
additional data.
• To view a list of the files on a Back Up Files disc, open the .RFI file
placed on the disc.
Backup Files options
Click Options on the control panel to open the Options window. Here
you find settings that can be used to customize your application.
Each available group of options is displayed in the left pane. Click the
name of an options group, and those option settings appear on the
right.
Each panel includes a Restore Defaults button that can be used to
restore the default settings for the options on that panel only.
Note: Not all options are available for all drives or operating systems.
Backup options-File Backup panel
Use the Backup panel to customize the following Backup Files settings:
• File category options-Use this option to create a custom file
selection category or to add additional file types to any of the
preset categories.
• Launch Backup Files when my external hard drive is
re-connected-Select this option to easily back up files to an
external hard drive.
• Verify data written to the disc after burning-A check mark
in this box adds a verification step to make sure that no errors
occur during the recording of your discs.
To create a new custom category called My Custom Category:
1 Select My Custom Category from the list of file categories.
2 Type a file extension into the Extension text box.
3 Click Add. The file extension is added to the list box on the right.
4 Continue adding file extensions one at a time until you are
finished.
To remove a file extension from your list, click its name in the list
box, then click Remove.
5 Click OK to save your list as My Custom Category.
11-0170_DX-PHD25_MAN_ENG_V1.fm Page 8 Thursday, March 17, 2011 11:51 AM