


4
Setting up your hard drive enclosureDX-PHD25
The operating system automatically detects and sets up the new
drive.
If the drive is correctly detected, a new drive letter is assigned to
the enclosure.
• For PCs, the new drive letter appears in My Computer.
• For Macintosh computers, the new drive letter appears on
the desktop.
Note for Windows users: If you do not see an additional drive in your
system, you must format the new drive. See Windows online help for
more information.
Notes for Macintosh users: Select Disk Utilities from the Utilities
folder, then select the external enclosure and format the drive to meet
your requirements.
Partitioning and formatting a new hard
drive
Creating a new partition in Windows
Caution: Doing the following will erase any existing data on the drive. If
the drive is damaged and you wish to recover the data, continuing
may overwrite the existing information!
Note: For new hard drives, you need to initialize and partition your hard
drive before it will appear in Windows Explorer.
The best way to partition a new hard drive is to use the manufacturer’s
program. Most hard drives should come with a CD that includes the
installation program. If not, visit the manufacturer's website to see if a
download is available. If the manufacturer’s program is not available,
try the following instead:
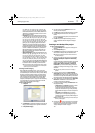
To create a new partition in Windows:
1 Right click on My Computer, or Computer, depending on which
version of Windows you have) then click Manage.
2 Under Storage on the LEFT pane, select Disk Management.
Windows gives you the option to initialize the disk. If not, locate
the new drive, right click on it (where it reads “New Simple
Volume”), then click Initialize. (This step may not be required
for some hard drives).
3 Follow the prompts.
4 When the process is complete, locate your hard drive in the
bottom right pane. Right-click on the area with a status bar (to
the right of the “New Simple Volume” area), then click New
Partition.
5 Continue following the wizard’s directions. The recommended
partition type is “primary” and the recommended file system is
“NTFS.” Note that Windows XP limits FAT32 partitions to only
32GB.
You should now be able to see the drive in Windows Explorer.
Formatting the hard drive in Windows
Note: Formatting is only required for a new hard drive. Do not format a
drive that contains valuable data that you want to save.
To format the hard drive using Windows:
1 Right click My Computer (or Computer, depending on what
version of Windows you have), then click Manage.
2 Under Storage on the LEFT pane, select Disk Management.
3 Locate the new drive, right click on the partition to be formatted,
then click Format.
4 Follow the prompts selecting the file system and other choices
you want, then click OK.
Creating a new partition in Mac OS X 10.4 or higher
If you are using a new hard drive, you may need to initialize it first.
Initialize your internal hard drive using Drive Setup from the Mac OS
CD that came with your computer.
To initialize a Hard Drive:
1 Start up your computer from the Mac OS CD.
2 Locate the Utilities folder on the Mac OS CD and double-click it
to open the folder.
3 Double-click Drive Setup to open the program.
4 From the list of drives, select the drive you want to initialize, then
click Initialize.
To format your hard drive with Mac OS Extended format:
This method of formatting hard drives provides for a more efficient use
of hard drive storage space.
1 Click Custom Setup.
2 Select the Type menu in the Volume info area, then click Mac
OS Extended Format.
3 Resize the volumes if desired.
4 When ready, click OK, then click Initialize.
If initialization fails, do the following:
1 Click Initialization Options from the Functions menu.
2 Select “Low level format”, then click OK. Choosing this option
adds significant time to the initialization process.
Formatting the hard drive on a Mac
To format the hard drive:
1 Click Disk Utility (under Applications).
2 Select the new hard drive you are trying to install.
3 Click the Erase tab.
4 Choose a volume format and assign a name to the new drive,
then click Erase.
Installing the software
The installation CD includes backup software to enable you to back up
your files.
Note: This Roxio BackOnTrack software runs only on Windows 7,
Windows Vista, and Windows XP computers using USB.
Important: Before installing the backup software, make sure that your
Windows operating system has been updated to the latest service
pack. To make sure you have the latest service pack, run Windows
Update. No additional driver is required.
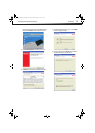
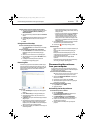
To install Roxio BackOnTrack:
1 Save all files and close all programs.
2 Insert the included CD into your optical drive. The introductory
screen opens.
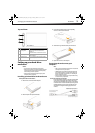
Optional USB 2.0 Y
connector for additional
power (if necessary)
11-0170_DX-PHD25_MAN_ENG_V1.fm Page 4 Thursday, March 17, 2011 11:51 AM