Page 3
10/30/2001
Manual Part Number 900-00027-001
1.2.3 Network Configuration on Your PC
Now, you will need to choose an IP address for your PC. If you are already on
a local office network and you have obtained and entered an IP address on the
Eagle as described above, you shouldn’t need to make any changes to your
PC. Skip to 1.2.4. Otherwise, if you are not already on a local network, then
simply choose an address whose last number is close to that of the Eagle(s). If
you are using the default address of 192.168.2.3 on your Eagle, for example,
then it is recommended that you choose something like 192.168.2.1 for your
PC.
Change network configuration settings and specify an IP address as follows:
1. Right click the Network Neighborhood icon on your desktop and go to “Properties”.
If you do not have a Network Neighborhood icon on your desktop, click Start-
>Settings->Control Panel->Network or Network Settings.
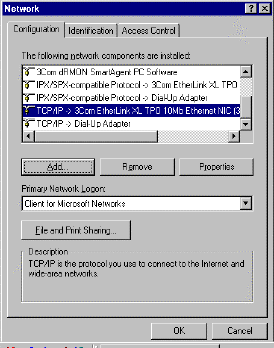
2. Find the listing with TCP/IP. Depending on what version of Windows you are
running, it may be under Configuration, Protocol, or Local Area Network.
Figure 1.2.2 Example of Network Configuration Dialog on PC
3. Click on the TCP/IP Protocol from the list that is bound to your Eagle (i.e.
the TCP/IP item with your Ethernet card shown beside it or, on some
systems, simply “TCP/IP” by itself). Figure 1.2.2 shows an example of what
the dialog may look like with TCP/IP selected.
4. Click on the “Properties” buttons.
5. Select the “IP Address” tab on the TCP/IP properties dialog (see figure 1.2.3
for an example of what this dialog may look like).
6. Click the “Specify an IP Address” radio button.
7. Enter the IP address you chose for your PC in the “IP address” text box.
8. Enter a subnet address mask in the appropriate box. Use 255.255.255.0.
9. Click “OK”
