


Alarm Configuration
4-6 Basic Alarm Configuration
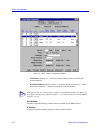
The remainder of the window fields provide the means for configuring alarms for each
available interface. Note that the information provided in this screen is static once it is
displayed; for updated information, click on the Refresh button. Adding or modifying an
alarm automatically updates the list.
Creating and Editing a Basic Alarm
The editable fields at the bottom of the Basic Alarm Configuration window allow you to
configure alarm parameters for each available interface. These fields will display the
parameters used for the most recently configured alarm (no matter which interfaces are
selected in the list box); this allows you to set the same parameters on multiple interfaces
with a single set. Hold down the Shift key while clicking to select a contiguous group of
interfaces; use the Ctrl key to select any interfaces. To display the alarm parameters for a
specific interface, double-click on that interface.
Note that there is no specific “Enable” function; simply configuring thresholds and/or
actions for an alarm and applying those changes enables the alarm. For details on
disabling an alarm, see Disabling a Basic Alarm, on page 4-9.
To configure an alarm:
1. At the top of the window, click to select the variable to be used for your alarm:
Kilobits, Total Errors, or Broadcast/Multicast. The display in the list box
will reflect the current status at each interface of the alarm type you have
selected.
2. In the list box, click to highlight the interface (or use shift-click or ctrl-click to
select multiple interfaces) for which you would like to configure an alarm for
the selected variable. Note that the editable fields will display the parameters
assigned to the most recently set alarm; however, any changes you make in
these fields will be set to
all
selected interfaces.
3. In the Interval field, enter the amount of time, in days, hours, minutes, and
seconds, over which the selected variable will be sampled. At the end of the
interval, the sample value will be compared to both the rising and falling
thresholds. You can assign any time interval up to 24,855 days. If you set an
incorrect time value (e.g., you enter 75 minutes instead of 1 hour, 15 minutes)
you will receive an error message. Click OK and enter the correct time value.
TIP
Before you decide whether or not to assign an action to a rising or falling alarm, it is
important to understand something about the hysteresis function built in to the RMON
alarm functionality. See How Rising and Falling Thresholds Work, on page 4-27, for
more information.