


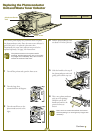


Replacing the Photoconductor
Unit and Waste Toner Collector
Replacing the Photoconductor
Unit and Waste Toner Collector
The control panel display lets you know when to replace
the photoconductor unit. Since the waste toner collector is
part of this unit, it is replaced at the same time.
Ocassionally, the waste toner collector may need to be
replaced separately. See page 3 for instructions.
The photoconductor unit requires careful
handling. Avoid exposing the unit to room light
any longer than necessary. Also, don’t touch or
scratch the surface of the drum.
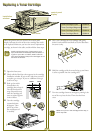
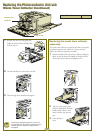
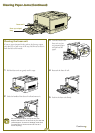
1 Turn off the printer and open the front cover.
2 Turn the large lever
counterclockwise 90 degrees.
3 Turn the small lever on the
photoconductor unit to the
right.
front cover
Photoconductor Unit S051061
photoconductor
unit
Continue
▲
2
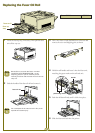
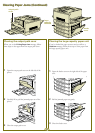
4 Pull the photoconductor unit
out about 12 inches (30 cm).
5 Grab the handle at the top of
the photoconductor unit and
gently pull it all the way out.
6 Take a new photoconductor
unit out of its package.
Hold the unit by the
handle and remove the
protective sheet as
shown.
Don’t touch or scratch the surface of the drum.
Avoid exposing it to room light any longer than
necessary.