


STEP 3: Setting Your Page Setup & Getting Ready to Print
Next, choose “Print with Preview...” from the le menu. Notice the document dimensions, then
click the “Page Setup...” button and set the proper page size and options and click “OK”.
Back in the “Print with Preview” dialog, you can visually conrm that your image will t on the
printed page, then check the “Show More Options” check box, and choose “Color Management”.
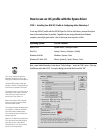
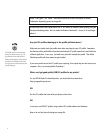
Your dialog box should now look something like this:
Under “Source Space:” the Document radio button should be selected. You may see a different
RGB prole tagged for your image le versus the example “Lab Color” above. It may say “Adobe
RGB (1998)” or even “ColorMatch RGB”. If it says “Untagged RGB”, then Photoshop will apply
the default RGB Working Space prole that you dened in Step 1, which was “Adobe RGB (1998)”.
Under “Print Space:” the “Prole:” selection should be set to an RGB ICC printer prole designed
for your combination of printer model, paper, ink, and driver setup.
Print with Preview Dialog within Photoshop 7
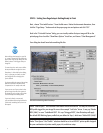
After verifying what image size your le
is, create a Custom Page Size within the
Epson driver Page Set-up dialog box and
dene it about 1-inch bigger than your
image le.
To center the print, make sure to dene
the top and bottom margins the same.
Photoshop 7’s Print with Preview dialog
box, is a great way to visually see how
your image will fall on the page size
you’ve dened.
For images within the gamut of the printer,
Relative Colorimetric with Black Point
Compensation ‘on’ usually works well.
If you are not sure if your printer’s color
gamut is larger than the color gamut of
the image le you’re trying to print, then
use the Perceptual rendering intent.
If you notice blocky or unsmooth
color transitions when using the Relative
Colorimetric rendering intent, then use
Perceptual.
5