


Epson Printer Driver Advanced Settings Dialog
Epson Print Dialog
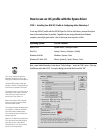
STEP 4 : Setting Up Your Printer Driver Settings and Printing Your Image!
Take note of the Print Space Prole selection within the “Print with Preview” dialog box then click
the “Print” button. The following dialog box will appear:
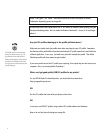
When the Epson print dialog appears, click on the “Custom” radio button then the “Advanced...”
button and carefully create and save a new driver setup for that particular RGB ICC prole.
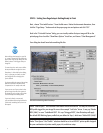
Here is an example Advanced Settings Dialog screen setup for an ICC prole that was created for
“Premium Glossy Photo Paper”, Printing in “Color/B&W”, at 2880 dpi, with High Speed ‘off’ and
the “No Color Adjustment” radio selected.
After you have chosen the correct printer driver setup for this prole, then click the “O.K.” and
“Print” buttons to actually start printing. That’s it!
You must make sure the printer driver
settings match exactly the way the RGB
ICC Prole is expecting them to be set.
All ICC proles were created with certain
printer driver settings.
You must nd out how your particular
ICC prole was created and set your
printer driver settings to match them
exactly.
Also, make sure you are using the correct
printer model, ink type, and media for
that particular ICC prole!
On SP7600 and SP9600 UltraChrome
models, make sure you know which
Black Ink Mode you’re in - Photo Black or
Matte Black?
7