


Self test:
Hold down the LF/FF button (for LQ printing) or the
LOAD/EJECT button (for draft printing) while
turning on the printer. The self test lets you
check that your printer is operating properly.
Hold down the ALT button while turning on the
printer to print out a list of the current
DIP-switch settings.
See the section on testing the printer in Chapter
1 for more information.
Data dump:
Hold down the LF/FF and LOAD/EJECT buttons
while turning on the printer to enter data
dump mode. Data dump mode allows
advanced users to find the cause of
communication problems between the printer
and the computer.
The data dump mode is more fully explained at
the end of this chapter.
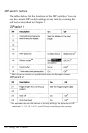
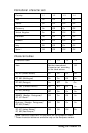
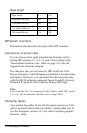
DIP Switches
By setting the printer’s two sets of DIP switches, you can
control various printer features, such as the graphics character
set and page length. New settings take effect whenever the
printer is turned on. The DIP switches are located inside the
compartment next to the control panel.
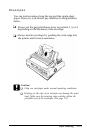
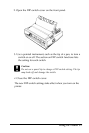
Changing a DIP-switch setting
To change a DIP-switch setting, follow these steps:
1. Turn off the printer.
3-6 Using the Printer