


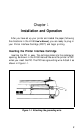


Now that the PIC is installed, you need to change the settings of
three small switches, called DIP switches, in the back of the printer,
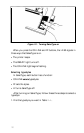
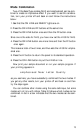
Figure 1-2 shows where the DIP switches are.
Figure l-2. DIP switch location
The functions of these switches are explained in detail in Appendix
D, but all that you need to do now is turn three of them on. All the
others should be off. (The switches are down when they are off and up
when they are on.) Before you change any of the DIP switch settings
make sure that the power switch on the right side of the printer is
turned off.
The DIP switches are in two groups, with eight in the first group
and four in the second. Turn on switches 6, 7, and 8 in the first group.
Now you are ready to test your printer.
Printing the Self Test
It’s time to see the LX-90 in action. You’ll start with a self test. Don’t
connect the printer to your computer yet-just follow these steps:
1. Make sure that your printer has paper in it and that the power
switch (on the right side of the printer) is off.
4