


Removing and Replacing the Enclosure
The procedures for replacing the gas lift and adjusting the levelling
of the top surface require removing the HSA 822 from the table.
Remove and replace the surface mount enclosure for maintenance as
follows:
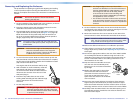
WARNING: Ensure that AC power is disconnected before
servicing the HSA unit.
1. On the underside of the clamshell and in the enclosure, cut the tie
wraps that route the AAP cables out of the way.
2. Disconnect the IEC power cord and RJ-45 connectors from the
underside of the surface mount enclosure.
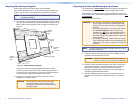
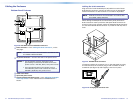
3. On both AAP panels, remove the top and bottom screws on the
right and left sides of the AAP panel (see figure 12 on page 18).
Retain the screws. Lift the panels away from the enclosure as
far as the connected cables allow and then allow the panels to
dangle, supported by their connected cables.
NOTE: The center screws on each side of the AAP panel do
not fasten the AAP panel in place. They secure the AC
power outlet.
CAUTION: Ensure that the edges of the AAP panels do not
scratch the finished surface of the top panel
flange or the furniture in which the HSA 822 is
installed when removing the panels.
4. To ensure that the bottom RJ-45 connectors match up with the
AAP panel RJ-45 connectors when the maintenance is complete,
tag the internal CAT 6 cables to define their installation location
(top or bottom and side A or B).
Also tag the side of the enclosure itself (A or B).
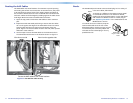
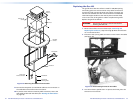
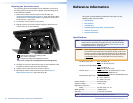
5. With a Tweeker or small screwdriver, inside the
AAP panels, push down on and gently twist
on the front of each RJ-45 connector detent to
disconnect the connector from the rear of the
AAP panel plug-in.
6. Disconnect any cables from the rear of the
existing AAPs. Carefully pull the cables through
and out the bottom of the surface mount
enclosure.
7. Set the AAP panels aside.
WARNING: The flanged edges of the top of the surface
enclosure are sharp when the HSA is removed
from the table. Exercise caution when handling
to prevent personal injury.
CAUTIONS: • Theangededgesofthetopofthesurface
enclosure are bevelled to an ultra-fine thickness of
less than 0.04 (4/100) inch (approximately 1 mm).
These edges are soft and can be easily nicked
or bent. Exercise caution when handling and
mounting the enclosure. Mishandling can damage
the appearance of the enclosure.
• The surfaces of the HSA enclosure have screws and
other protruding hardware that could damage fine
furniture. Do not rest the enclosure on unprotected
furniture.
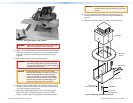
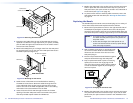
8. On the underside of the table, remove the two bolts that secure
the clamshell to the surface mount enclosure (see figure 15 on the
next page). Lift the enclosure out of the table.
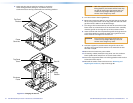
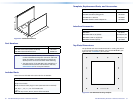
9. Remove and retain the four corners screws on each side of the
enclosure shroud “cube”. Remove the two halves of the shroud.
NOTE: You do not need to remove the center screws on each
side. They do not secure the shroud in any way; rather,
they provide structural support to the enclosure.
10. Perform the desired maintenance or modification procedure.
11. If the surface is not level or the top panel is not level with the
flange, adjust the top surface. See “Adjusting the Top Surface” in
this chapter.
12. Connect the appropriate cables to the rear of the AAPs installed
on the AAP panels. Route the cables through the hole in the
underside of the surface mount enclosure and connect them to
the rear of the AAPs. Refer to the cabling information in the
documentation for the AAP.
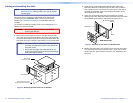
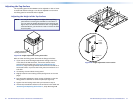
13. Snap the interior RJ-45 cable connectors
onto the rear of the RJ-45 AAP panel
bezel plug-ins in the locations identified
by the tags.
14. Replace the AAP panels in the surface
mount enclosure and secure them in
place with the screws removed in step 3.
If you lose an AAP panel screw, four
spare screws are stored in the underside
of the enclosure.
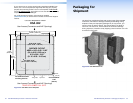
15. Secure the two shroud halves to the enclosure frame with the
eight screws per shroud half (four per side) removed in step 9.
Orient the shroud halves such that the vertical column of center
holes align with the column of screw inserts on the vertical slides.
16. Carefully lower the HSA enclosure into the table opening. From
the underside, bolt the clamshell to the enclosure with the two
bolts removed in step 8.
RJ-45 Bezel
Plug-in in AAP
Panel
20 HSA 822 Hideaway Enclosure • Maintenance and Modications 21HSA 822 Hideaway Enclosure • Maintenance and Modications