


Operation, cont’d
MAV Series Switchers • Operation3-14
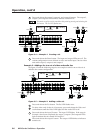
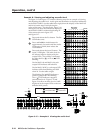
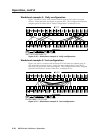
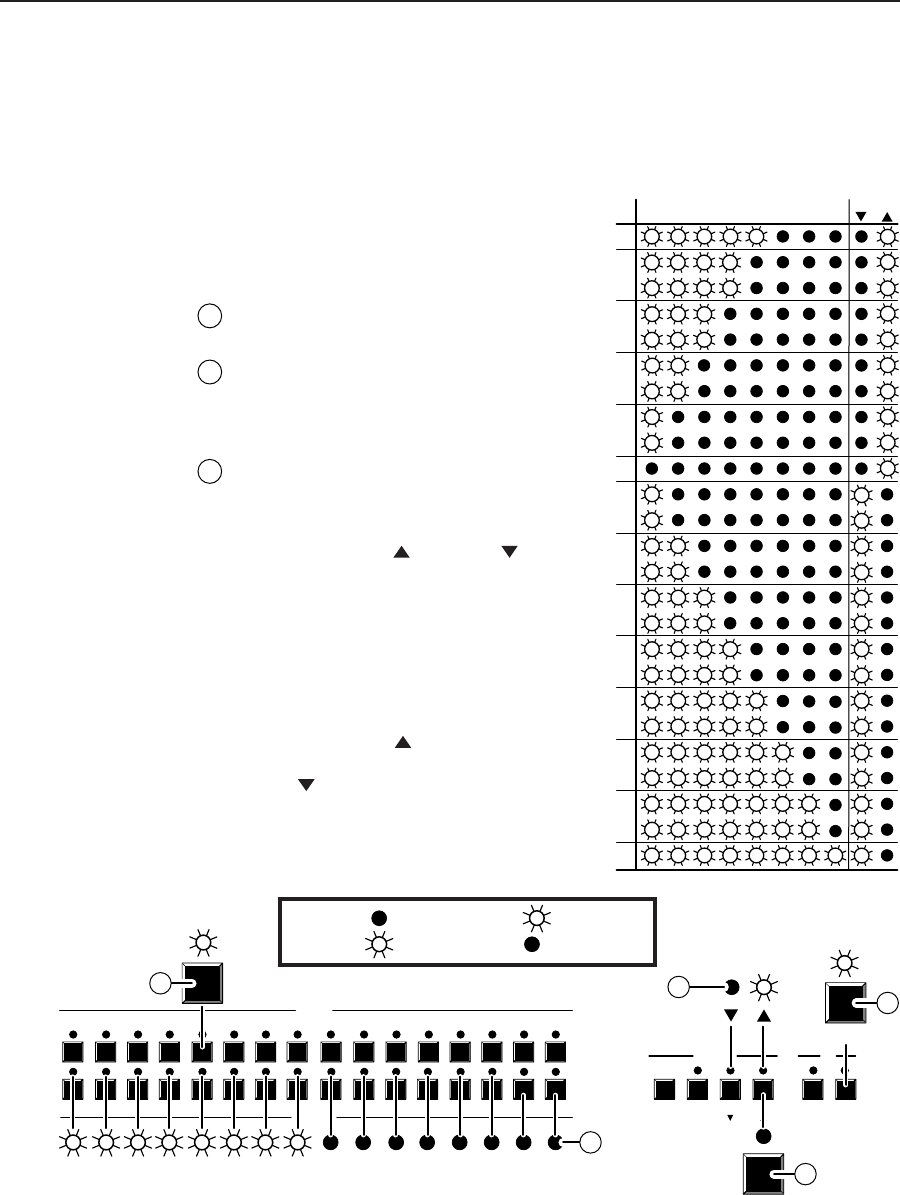
Example 8: Viewing and adjusting an audio level
See figure 3-15 and figure 3-17 and the following steps for an example of viewing
and adjusting the audio level. Audio gain and attenuation is displayed differently
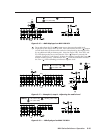
on the MAV 128 RCA (see the table below right) from the display on the MAV 168
and 1616, but the steps for displaying the
value are the same. For this reason, figure 3-16
and figure 3-18 show the indications displayed
on the MAV 128 RCA without duplicating all
of the actions shown in figure 3-15
and figure 3-17.
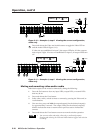
A
Press and release the Esc button. The Esc
LED flashes once.
B
Press and hold the Audio button for
approximately 2 seconds until the Audio
LED begins to blink, then release the
Audio button.
C
Press and release the input 5 button. The
input 5 LED lights. The audio level for
the selected input is displayed by the
output LEDs. The polarity is indicated
by either the Esc (
) or View ( ) LED
blinking.
On the MAV 168 and MAV 1616, each
output LED indicates 1dB when lit.
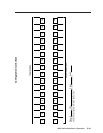
On the MAV 128 RCA, each output LED
indicates 1dB when blinking and 2dB
when lit. See the table at right.
The blinking Esc (
) LED indicates a
positive (gain) level. The blinking
View (
) LED indicates a negative
(attenuation) level. Figure 3-15 and
figure 3-16 show an audio level of +8dB
displayed in the output LEDs on the two
different MAV panels.
1
1
2
2
3
3
4
4
5
5
6
INPUTS
6
7
7
8 9 10 11 12
8
9 10 11 12
13
13
14
14
15
15
16
16
ENTER PRESET VIEW ESC VIDEO AUDIO
CONTROL I/O
OUTPUTS
ESC
AUDIO
A
B
F
C
B
B
C
5
C
+8dB
B
LED key: = off (value 0dB), = blinking,
= on (value 1dB), = flash once
F
Press
Hold
Press
Figure 3-15 — Example 8: Viewing the audio level
15342867
Output LED
MAV 128 RCA
dB
+9
+8
+7
+6
+5
+4
+3
+2
+1
0
-1
-2
-3
-4
-5
-6
-7
-8
-9
-10
-11
-12
-13
-14
-15
B
B
B
B
B
B
B
B
B
B
B
B
B
B
B
B
B
B
B
B
B
B
B
B
B
B
B
B
B
B
B
B
B
B
B
B
B
B
View Esc