


Installation
4
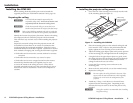
Installing the PCM 240
Before starting, check that all the parts received match the
supplied parts list (see “PCM 240 kit contents” table, page 10).
Preparing the ceiling
W
The PCM 240 must not be supported by the
suspended ceiling itself. It must be secured to and
suspended from the structural ceiling above.
W
Check the structural ceiling to ensure that it can
handle a load four times the weight of the final setup.
N
Refer to local building standards and codes to verify that
the installation will meet all the regulatory requirements.
Identify the location for projector placement. Remove the ceiling
tiles adjacent to the tile where the projector will be mounted.
This will allow easy and safe access while installing the projector
mount.
Inspect the structural ceiling where the projector mount will
be installed to ensure there are no cracks or weaknesses that
could jeopardize the completed installation. Select the correct
installation hardware from those supplied. Hardware for each of
three methods of hanging and securing the PCM 240 is supplied:
• Turnbuckles and tie wire tied to concrete anchors for concrete
structures
• Turnbuckles and tie wire tied to eye screws for joists
• Turnbuckles and tie wire wrapped around wooden trusses.
Alternatively, threaded rods (not supplied) may be used
to secure the mount to the ceiling structure. Safety cable is
provided to hold the mount up in the event that any tie wire or
rods become loose or detached as a result of an earthquake or
accident.
PCM 240 Projector Ceiling Mount • Installation
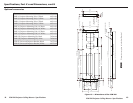
Installing the projector ceiling mount
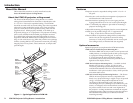
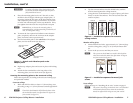
1. Screw the four T-bar securing screws loosely into the ends
of the mounting plate (see figure 2).
Attach Turnbuckles
to Long Sides
T-bar Securing
Screws
Pipe Adapter Plate
Lock Nuts
10
Attach Ceiling
Anchors and Wire
10 Degrees from
Vertical.
T-bar
Mounting Plate
Figure 2 — Installing the PCM 240
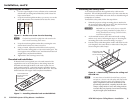
2. Place the mounting plate over the selected ceiling tile and
lower onto the T-bar. Adjust to the position desired and
lightly tighten the T-bar securing screws to the frame.
3. Adjust the sliding pipe adapter plate to the precise position
for the mounting pole, and tighten down the locking nuts.
4. Using the hole in the pipe adapter plate as a guide, mark
the ceiling tile where the mounting pole will pass through
it. If electrical boxes are also to be installed, mark the
ceiling tile where the cut-outs will be.
5. Loosen the T-bar securing screws and remove the
mounting plate.
6. Remove the tile, and carefully cut out the marked area(s).
7. Replace the ceiling tile.
N
Be sure to place the ceiling tile back in the same T-bar
square, with the same orientation as it had originally.
Failure to do so will result in misalignment of the
projector.
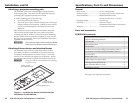
8. Attach any 3" deep, ¼ rack devices or electrical boxes
required onto the mounting plate. Depending on the
situation, this may be easier to do after the plate is fully
installed.
C Using flex conduit is recommended when installing
any power wiring.
5
PCM 240 Projector Ceiling Mount • Installation