


7
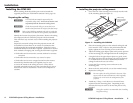
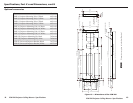
2. Tap the concrete anchors into the drilled holes, until the
head is seated against the ceiling material.
3. Using the claw on the hammer or a pair of pliers, pull down
firmly on each of the anchors. This will set and secure the
anchors in place.
Drill hole
Secure tie wire
Pull down
Tap in anchor
Figure 4 — Installation sequence for concrete
ceiling anchors
Wooden ceiling joists
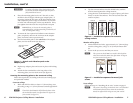
1. Mark and drill four holes, approximately 1¼" (32 mm) deep
into the ceiling joists, using a 5/16" (8 mm) diameter drill
bit.
2. Screw in the eye screws until they are secure.
N
The eye screws should not be screwed in directly above
where the turnbuckles attach but offset about 10 degrees
out from vertical (see figure 2).
1. Drill Pilot
Hole
2. Screw in
Eye Screw
Secure
Tie Wire
Figure 5 — Installation sequence for wood joist
screws
Truss ceilings
Follow the steps in “Attaching the tie wire” section on page 8.
N The point in the ceiling at which the wire is to be attached
should not be directly above where the turnbuckles
attach, but offset about 10 degrees out from vertical.
PCM 240 Projector Ceiling Mount • Installation
W
.
For safety, all wiring of the electrical boxes and
accessories should be completed after the plate is
fully installed and secure.
9. Place the mounting plate back over T-bar rails, so that
the hole in the tile aligns with the pipe adapter plate. If
necessary, loosen the lock nuts on the pipe adapter plate
and readjust the plate to align over the hole. If you wish
to fit the anti-vibration pads, follow step 10 below. If not,
just tighten down the lock nuts and proceed to step 13.
N DO NOT rest, or lean on the mounting plate or
suspended ceiling grid when attaching turnbuckles, tie
wire, or drilling into ceiling.
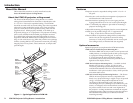
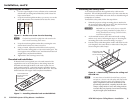
10. To mount the four optional self adhesive anti-vibration
pads, completely unscrew the lock nuts on the adapter
plate, and remove the top section only.
11. Peel and attach the pads to the underside of the adapter
plate, one near each corner (see figure 3).
Attach Anti-vibration
Pads Here
Attach Anti-vibration
Pads Here
Figure 3 — Attach anti-vibration pads under
adapter plate
12. Replace top adapter plate and secure in place with locking
nuts.
13. Attach the four turnbuckles to the long sides of the
mounting plate, one near each corner (see figure 2).
Securing the mounting plate to the structural ceiling
Follow the steps below, according to the structural ceiling type,
and preferred method.
Concrete ceilings
1. Mark and drill four holes, at least 1½" (38 mm) deep, into
the ceiling, using a ¼" (6 mm) diameter carbide tipped drill
bit.
N These holes should not be drilled directly above where
the turnbuckles attach, but offset about 10 degrees out
from vertical (see figure 2).
Installation, cont’d
PCM 240 Projector Ceiling Mount • Installation
6