


6
5. Attach the Boom Arm, Power Supply, and Projector
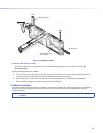
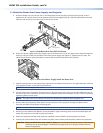
a. Hook the boom arm over the top rail on the base plate so that the tab on the arm (see figure 6, inset) is
against the rail. Secure the arm at the bottom with the two supplied (10-32 x 3/8 inch) pan head screws and
washers, and at the top with the single ¼-28 x ¾ inch screw.
Phillips
Pan Head Screws
Screw
Set Screw
Screws
and Washers
Figure 6. Hook Boom Arm Over Rail and Secure
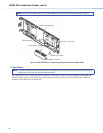
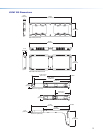
b. Secure the power supply within the support end of the boom arm. To do this, pass the tie wraps through the
holes on one side of the arm and then around the power supply (see figure 7). Tighten the tie wraps. The
cables should then be easily and safely routed to the electrical outlet and to the switcher.
RGB
L
R
L R
L R
AU
X AUDIO
PU
T 5
LINE OUT
OI
CELIFT
EI
VER
PAGING
SENSOR
DO NOT
GROUND
OR SHORT
SPEAKER
OUTPUTS
RS-232 MLC/IR
2/4/8
Ohms
CLASS 2 WIRING
AMPLIFIED AUDIO OUT
VOL/MUTE
TxRxIR12V
10V 50mA
US
17TT
AUDIO/VIDEO
APPARATUS
CONTROL
Figure 7. Secure the Power Supply inside the Boom Arm
c. Extend the boom arm to the appropriate projector throw distance and secure in the applicable slots with the
four supplied (¼-20 x ½ inch) screws and washers.
NOTE: Do not overtighten the screws.
d. Loosen the set screw (located in the lower hole on the boom arm end), and screw the threaded pipe up into
the end of the arm. A minimum of three turns is needed to safely secure the pipe in place. Lock it in place by
tightening down the set screw.
NOTE: The upper hole on the boom arm end is for attaching an optional seismic/support wire.
e. Run the VGA and composite video cables from the switcher to the projector through the boom arm so
that they exit down the projector mounting pipe.
NOTE: Provide sufficient cable slack within the boom arm to allow for future arm length adjustment.
f. Referring to the UPB 25 User Manual, screw the UPB 25 upper mounting plate onto the threaded pipe and
attach the projector to the UPB 25 projector bracket.
g. Attach the projector bracket (with projector installed) onto the UPB 25 mounting plate and secure.
h. Connect the output cables from the switcher, any MLC control cables, and the power cable to the projector.
CAUTION: Electrical Shock that may result in injury. Do not thread the projector power cable through
the boom arm or mounting pipe. Threading it through the arm or the pipe violates national
electrical regulations.
USFM 100 Installation Guide, cont'd