


FastIron GS Compact Layer 2 Switch Hardware Installation Guide
B - 4 © 2007 Foundry Networks, Inc. September 2007
CAUTION: For the DC input circuit to the system (DC power supply part number RPSDC-FGS), make
sure there is a 30 amp circuit breaker, minimum -48Vdc, double pole, on the input to the
terminal block. The input wiring for connection to the product should be copper wire, 10
AWG, marked VW-1, and rated minimum 90 degrees celcius.
VORSICHT: Für den Eingangs-Gleichstromkreis zum System (Gleichstromnetzteile mit der Teilenr.
RPSDC-FGS) ist ein 30 A (Minimum), -48 V DC, doppelpolig, am Eingang zur Reihenklemme
zu installieren. Bei der Eingangsverdrahtung zum Anschluss des Produkts sollte es sich um
einen 10 AWG-Kupferdraht (VW-1) und einer Mindestnenntemperatur von 32° handeln.
MISE EN GARDE: Pour le circuit d’alimentation C.C du système (références du bloc d’alimentation C.C.
RPSDC-FGS), assurez-vous de la présence d’un disjoncteur de 30 ampères, minimum –48 V
C.C., double coupure, sur l’entrée vers le bloc d’alimentation. Les câbles d’alimentation pour
le produit doivent être en fils de cuivre, 10 AWG (American Wire Gauge), marqués VW-1 et
classés 90 degrés Celsius.
PRECAUCIÓN: Para el circuito de entrada de CC al sistema (suministro de corriente continua con No. de
referencia RPSDC-FGS), verifique que existe un cortacircuitos catalogado de 30 amperios,
como mínimo, -48 VCC, bipolar, en la entrada al bloque terminal. El cableado de entrada para
la conexión al producto deberá ser de cable de cobre catalogado, 10 AWG, marcado con VW-
1, y tener una capacidad nominal mínima para 90 grados centígrados.
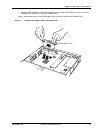
CAUTION: Make sure you insert the power supply right-side up. It is possible to insert the supply upside
down, although the supply will not engage with the power backplane when upside down. The
power supply is right-side up when the power connector is on the left and the fan vent is on
the right.
VORSICHT: Sicher Sie sicher, dass Sie das Netzteil mit der richtigen Seite nach oben weisend
einstecken. Man kann die Karte auch umgekehrt einstecken. Allerdings rastet das
umgekehrte Netzteil nicht in die Netzstrom-Rückwandplatine ein. Die rechte Seite des
Netzteils weist nach oben, wenn sich der Stromanschlussstecker links und der
Ventilatorschlitz rechts befindet.
MISE EN GARDE: Assurez-vous d'insérer le bloc d'alimentation dans le bon sens. Il est possible de l'insérer " la
tête en bas ", mais le bloc d'alimentation ne s'enclenchera pas dans la face arrière
d'alimentation s'il est inséré à l'envers. Le bloc d'alimentation est dans le bon sens lorsque le
connecteur se trouve sur le côté gauche et le ventilateur sur la droite.
PRECAUCIÓN: Verifique que inserta el suministro de corriente con la cara correcta hacia arriba. Es posible
insertar el suministro hacia abajo, pese a que este no se conectará con el enchufe posterior
de esta forma. El suministro de potencia estará con la cara correcta hacia arriba cuando el
conector de corriente quede a la izquierda y la abertura del ventilador queda a la derecha.
CAUTION: Use the erase startup-config command only for new systems. If you enter this command on a
system you have already configured, the command erases the configuration. If you
accidentally do erase the configuration on a configured system, enter the write memory
command to save the running configuration to the startup-config file.
VORSICHT: Verwenden Sie den Befehl "Erase startup-config" (Löschen Startup-Konfig) nur für neue
Systeme. Wenn Sie diesen Befehl in ein bereits konfiguriertes System eingeben, löscht der
Befehl die Konfiguration. Falls Sie aus Versehen die Konfiguration eines bereits konfigurierten
Systems löschen, geben Sie den Befehl "Write Memory" (Speicher schreiben) ein, um die
laufende Konfiguration in der Startup-Konfig-Datei zu speichern.
MISE EN GARDE: N'utilisez la commande erase startup-config que pour les nouveaux systèmes. Si vous entrez
cette commande sur un système que vous avez déjà configuré, elle efface la configuration. Si