


4
2 Installation
2.1 Installation Tips
When installing the freeView Power 80, keep the following points in mind:
• Install the unit in a cool and dry place. Refer to the specifications for details on permissible
temperature and humidity ranges.
• Install the unit in a location free from electromagnetic interference, vibrations, dust, and
direct exposure to sunlight.
• Leave at least 4” (10 cm) of space at the front and rear of the unit for ventilation.
• Install the unit on a strong, sturdy surface that can support its weight, or in an EIA standard-
size rack.
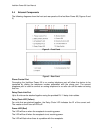
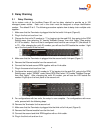
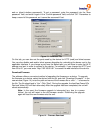
2.2 Network Diagram
Figure 1 shows an example of how to install the freeView Power 80 in a network.
Figure 1 – Sample Network Diagram
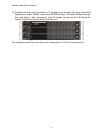
2.3 Mounting in a Rack
The freeView Power 80 can be mounted in an EIA standard-size, 19-inch rack, which can be
placed in a wiring closet along with other equipment. Attach the one mounting bracket to each
side of the unit, and secure them with the screws provided.
Once the brackets are attached, align the holes in the bracket with those in the rack, and use
the screws provided to install the unit into the rack.