


GEI-100305 Auxiliary Drive to ISBus Interface Board IS200ADII
•
••
•
19
Ø
ØØ
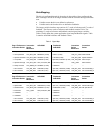
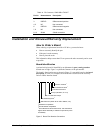
Ø To install the new (replacement) board on the board carrier
1. Orient the new board in the same position as the one removed, and seat the
board by firmly pressing the board onto the four tabs (on left side) of the back of
the front board carrier. (LDCC board is on front of this carrier.)
2. Reinstall all cables that were removed from the old ADII board (COM1 wire,
CHASSIS ground wire, LNPL, 2PL, TX and RX ISBus).
The chassis wire must be securely mounted to the drive’s
chassis to shunt the ISBus shield to ground.
Care must be taken to keep the chassis wire tight to the ADII
board and away from the power supply board at all times. Use
a wire tie down strap connected to the bottom of the board
carrier to keep it away from the power supply board.
Care must be taken to keep the ISBus cables away from any
high voltage wires and any electrically noisy wires. Keep the
cables tight to the ADII board carrier and use the tie down
strap holders to hold the cables close to the ADII board and
away from the power supply board.
3. Reinstall cable ties to the ISBus cables on the ADII board strain reliefs and on
the other cables/locations as necessary to keep the cables tight to the board and
board carrier, and away from the power supply board.
Note If the ADII board must be configured in any way, refer to the applicable
User's Guide for the drive/source for procedures.
4. Raise the board carrier back up into its normal position, slide the board carrier
retainers in to secure it in this position, and close the drive cabinet door.