


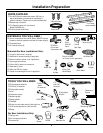

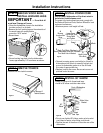
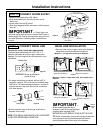

Power Cord
(If Used)
Water
Line
House
Wiring
Drain
Hose
Insulation
Blanket
Installation Instructions
7
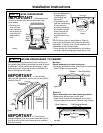
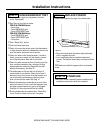
STEP 9 INSTALL TRIM PIECES
Skip this step if trim is not supplied with the
dishwasher.
• Locate trim strips inside dishwasher.
• Press trim onto the tub flange on each side. Start with
the top edge, pressing on as you move towards the
bottom.
• Press the two top trim pieces on each side of the latch.
• Open and close the door to check that trim does not
bind and does not interfere with door latch.
Figure R
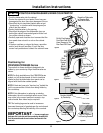
STEP 8 SLIDE DISHWASHER
PARTIALLY INTO CABINET
DO NOT PUSH AGAINST FRONT PANEL WITH KNEES.
DAMAGE WILL OCCUR.
• Slide dishwasher into the opening a few inches at a
time.
• As you proceed, pull the drain hose through the open-
ing under the sink. Stop pushing when the dishwasher
is a few inches forward of adjacent cabinetry.
• Make sure drain hose is not kinked under the dish-
washer and there is no interference with the water
line and wiring or any other component.
Figure Q
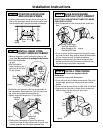
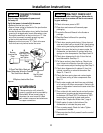
• Position the dishwasher in front of the opening.
Insert drain hose into the cabinet side. If power cord
is used, guide the end through a separate hole.
Figure O
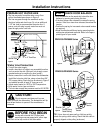
STEP 7
INSTALL DRAIN HOSE,
GUIDE THROUGH CABINET
• Remove tape and wire tie holding the clamp to the
drain hose. Be careful not to damage the drain hose.
• Stand the dishwasher
upright.
• Slip the supplied
hose clamp over the
small end of the hose.
Do not tighten.
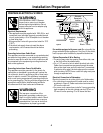
STEP 6 POSITION WATER LINE
AND HOUSE WIRING
• Position water supply line and house wiring on the
floor of the opening to avoid interference with base
of dishwasher and components under dishwasher.
Figure N
Do Not Push Against
Front Door Panel With
Knee. Damage to The
Door Panel Will Occur.
Trim Strip
Trim
Strip
Trim
Strip
• Push hose over the drain outlet on the back side of
the dishwasher. See illustration. Push the hose over
the outlet and against the shoulder stop.
• Tighten the hose clamp with a 1/4" nut driver.
Figure P
Drain
Outlet
Hose
Clamp
Shoulder
Stop
Water
Line
House
Wiring
5"
5"
4"
6"
4"