


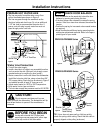
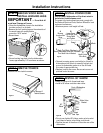
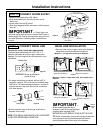

STEP 10 POSITION DISHWASHER UNDER COUNTERTOP
• Push the dishwasher into the cabinet.
• Push at the sides with your hands. Do not use your
knee against the door since door damage will occur.
• Check that the tub insulation blanket does not get
“bunched-up” or interfere with the springs as you
slide it into the cabinet.
• Center the dishwasher in the opening.
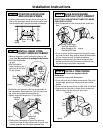
• Check that the edges of the dishwasher door are
behind the cabinet frame and aligned with the front
face of the cabinet as shown.
• Carefully open and close the door to ensure that the
door panel does not catch or rub on the cabinet
frame.
• If the door catches or rubs on the frame, reposition
and/or level the unit (see Step 11) until the door
moves freely and does not contact the cabinet frame.
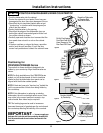
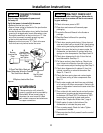
Positioning for
PDW9200-PDW9800 Series
The controls on these models are designed to be
hidden by your countertop. Align the dishwasher as
shown.
NOTE: For flush installations of the PDW9700 Series
models, cut off the back panel of the tub insulation
blanket so that the dishwasher door panel can be
aligned with the kitchen cabinet panels.
NOTE: If the drain hose gets “bunched-up” behind the
unit it can prevent the controls from being hidden by
the countertop.
NOTE: If this dishwasher is replacing an existing
dishwasher, the old countertop bracket screw holes
may not be in the correct position to accept a top-
control model. New holes may be required.
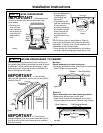
TIP: The leveling legs can be used to increase or
decrease the amount of gap between the controls and
the countertop affecting the visibility of the controls.
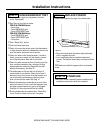
IMPORTANT – Leave enough gap
between the controls and the countertop brackets so
that the screwheads do not contact and scratch the
controls.
Figure S
Installation Instructions
Figure T
Do Not Push Against
Front Door Panel With
Knee. Damage to The
Door Panel Will Occur.
Reposition Dishwasher
by Grasping Both
Sides With Hands
Door
Fits and
Swings
Back
Behind
Cabinet
Frame
Correct
Alignment
Door Catches
on Cabinet Frame
Incorrect
Alignment
TIME REMAINING
Top View
Controls Hidden
by Countertop
Figure U
Figure V
Figure W
8
Control Panel
Countertop
Gap for Clearance
to Mounting Screws
Countertop