4
(To be done by a qualifi ed service technician). Upon initial
power-up of this device, valve pressure must be set for
fl ame adjustment.
1. Loosen output pressure tap on valve and connect with
pressure manometer.
2. Press mode button to “ON”; fi replace will light with
fl ames on high.
3. Turn solenoid clockwise to increase pressure, coun-
terclockwise to decrease pressure until manifold pres-
sure on high is 3.5 inch water column for natural gas
(NG), 10.0 inch water column for propane (LP).
4. Once pressure is achieved spin jam-nut on solenoid
stem tight against regulator face to prevent rotation.
While holding solenoid, tighten jam nut with 1/2”
wrench. This will ensure that the solenoid remains
locked in the proper position.
5. Press mode button to turn fi replace off.
6. Remove manometer tube and tighten or close pres-
sure tap. Use a commercially available, non-corrosive
leak check solution to carefully check the pressure tap
for leaks.
Setting Flame Height / Manifold Pressure
Note: A manometer MUST be used to set the manifold
pressure on the gas valve.
Installing the Control Box
• Do not install the control box when fi replace is hot.
• Do not plug control box in until all connections are complete.
1. Place control box into the base pan area of the fi re-
place. Place unit as close to the louvers or decorative
front as possible and to either the left or right side.
2. Connect the red, yellow or white, and green wires to
the appropriate labeled terminals on the control box.
Note: Proper settings and operation MUST be confi rmed
before installation is complete.
Note: Failure to ground the new 6 to 8 pin wiring harness
may cause the wall control to lock up.
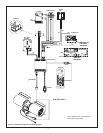
7. All wiring should be complete. See Figure 2 to confi rm
that all connections are correct.
8. After confi rming wiring is correct, plug in control box to
junction box.
3. If fi replace is equipped with a fan, plug the fan cord
into “A1” on the control box. Terminals that are not
occupied should be capped with the insulator caps
provided. Failure to cap unused auxiliary connectors
can result in a possible electric shock.
4. Disconnect the multiwire connector from existing
green control box. Connect the end just disconnected
to the matching terminal on the new black control.
5. Connect the new lead wire set to black and green con-
trol boxes matching connectors.
6. Attach the provided ground clip (see Figure 2) to
the nearest available sheetmetal edge. Attach the
black leads with the 1/4 inch female connector to the
ground clip.
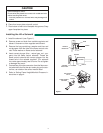
Shock hazard
• Failure to cap unused auxiliary connectors can
result in electric shock.
CAUTION
WARNING
Explosion risk
• Incorrect adjustment of solenoid may cause
delayed ignition.
Fire risk
• Incorrect adjustment of solenoid may cause a fi re.
WARNING


