


hp scanjet 2400, 3670, 3690, and 3970 digital flatbed scanners
chapter 2
7
7 A dialog box appears, asking if you want to scan another image. If you
have more originals to scan, click Yes.
– Place another original on the glass and close the lid. In the preview
window, click New Scan, make adjustments, and then click Accept.
OR
– Select another image within the preview window, make adjustments,
and then click Accept.
8 Follow the instructions on the screen to share your scanned item.
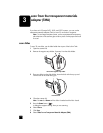
Note: You can also use the HP I
NSTANT SHARE button to scan slides or
negatives from the TMA. For more information, see scan from the
transparent materials adapter (TMA) on page 13.
create a photo show and save it on CD
Use the MEMORIES DISC CREATOR button ( ) on the front panel of your
HP Scanjet 3970 scanner to create personalized photo shows with music and
titles. Then you can watch the photo show on your television using a compatible
digital versatile disc (DVD) or video compact disc (VCD) player. You can also
make photo reprints from the CD. (You must have an Intel® Pentium II processor
or above, 700MB of free disk space, a read/write CD-ROM drive and writable
CDs to use Memories Disc Creator.)
If you have an HP Scanjet 2400, 3670, or 3690 scanner, you can create a
memories disc using the software. For more information, see the HP Photo &
Imaging software help.
1 Place the original face down on the scanner glass as indicated by the
reference marks on the scanner, and close the lid.
2 Press the M
EMORIES DISC CREATOR button ( ) on the scanner.
3 If you are prompted to select what you are scanning, select Original from
Glass, then click Scan.
A preview image of the scanned original appears.
4 Select the final scan area (the area inside the dotted lines) in the preview
image.
5 Make adjustments to the preview image if needed.
6 Click Accept.
7 A dialog box appears, asking if you want to scan another image. If you
have more originals to scan, click Yes.
– Place another original on the glass and close the lid. In the preview
window, click New Scan, make adjustments, and then click Accept.
OR
– Select another image within the preview window, make adjustments,
and then click Accept.
8 Follow the instructions on the screen.
Note: You can also use the M
EMORIES DISC CREATOR button to scan slides
or negatives from the TMA. For more information, see scan from the
transparent materials adapter (TMA) on page 13.