


user’s manual
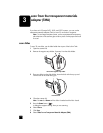
scan from the transparent materials adapter (TMA)
14
9 Click Scan.
The scanner performs a preview scan, and the preview image appears.
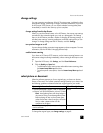
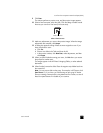
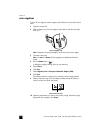
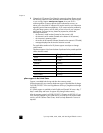
10 Select a final scan area within the slide. Click and drag a border around
the area you want for a final scan (final scan area).
11 Make any adjustments you want to the preview image. When the image
adjustments are complete, click Accept.
12 A dialog box appears asking if there are more originals to scan. If you
have more slides to scan:
a. Click Yes.
b. Place a new slide in the TMA and close the lid.
c. In the preview window, click New Scan, make adjustments, and then
click Accept.
13 When you have finished scanning your items, click No when you receive
the prompt for another scan.
The images appear in the HP Photo & Imaging Gallery or other selected
destination.
14 When finished, remove the slide. Place the negative strip holder back into
the scanner lid.
Note: You can scan a slide in other ways. For example, in HP Director, click
Scan Picture. Or, if you know you’ll be sharing an item using HP Instant
Share or creating a memories disc using Memories Disc Creator, use one of
these front panel buttons if included on your scanner.
select a final scan area
Final scan area