


68
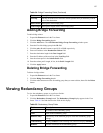
Configuring a Trunk Group
To configure an existing trunk group:
1. Expand the Ethernet icon in the Tree frame.
2. Click the Trunk Groups branch. The Trunk Groups table appears in the View frame.
3. Click the radio button next to the group that you want to delete, then click the Properties button.
The Ethernet Trunk Group Properties window opens.
4. (Optional) Create or change the name of the trunk group in the Name field.
5. (Optional) Check or uncheck checkboxes in the Port Members field to add or remove ports from
the group.
6. (Optional) Click a radio button in the Distribution Type field to change the type.
7. (Optional) Check or uncheck the Enabled checkbox in the Trunk Group Enabled field to enable
or disable the trunk group.
8. Click the Apply button.
Deleting a Trunk Group
To delete a trunk group:
1. Expand the Ethernet icon in the Tree frame.
2. Click the Trunk Groups branch. The Trunk Groups table appears in the View frame.
3. Click the radio button next to the group that you want to delete, then click the Delete button.
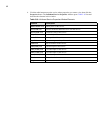
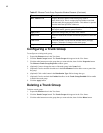
MAC Address field Displays the MAC address of the trunk group, such as
00:05:ad:01:59:30. This is a unique physical address associated
with the trunk (link-aggregated) interface. This address is separate
from the individual port MAC addresses.
IfIndex field Displays a management software unique identifier for all physical
and logical (trunks, gateway ports) interfaces.
Apply button Applies the changes that you make in the window.
Reset button Resets the fields in the window to match the properties of the trunk
group.
Close button Closes the window. If you close the window before you apply
changes, CM makes no changes to the trunk group.
Help button Opens on-line help.
Table 6-7: Ethernet Trunk Group Properties Window Elements (Continued)
Element Description