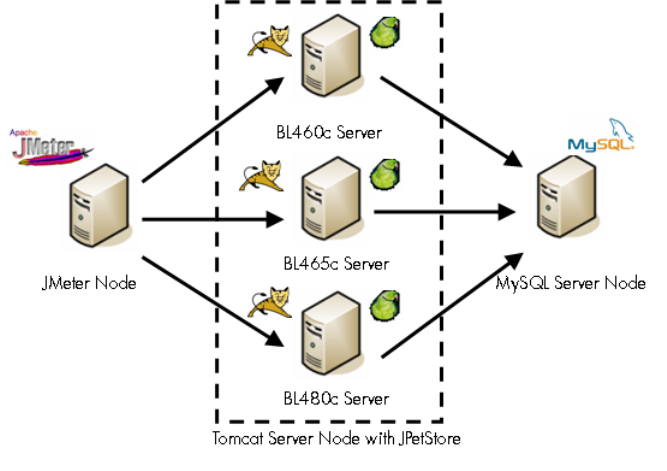
Figure 8 Application Scenario Test Environment Architecture
Before performing the JPetStore installation on the Web server, verify that the following
installations and configurations have been completed.
• Tomcat has been installed on the Tomcat server node and configured correctly.
• MySQL has been installed and configured on the MySQL server node. Make sure that MySQL
is running correctly.
• Download the MySQL JDBC Driver file, mysql-connector-java-5.0.4-bin.jar.
Copy the file to TOMCAT_HOME/lib directory.
Perform the following steps to install and configure JPetStore.
1. Download the latest version of JPetStore from the iTBATIS website.
2. Unzip the file JPetStore-5.0.zip to the appropriate directory.
In the JPetStore-5.0/src/ddl/mysql directory, locate the following files:
• jpetstore-mysql-schema.sql
• jpetstore-mysql-create-user.sql
• jpetstore-mysql-dataload.sql
3. On the MySQL node, run the following commands:
mysql -uroot -p < jpetstore-mysql-schema.sql
mysql -uroot -p < jpetstore-mysql-dataload.sql
mysql -uroot -p < jpetstore-mysql-create-user.sql
4. Copy JPetStore-5.0/build/wars/jpetstore.war file to the folder
TOMCAT_HOME/webapps.
Tomcat automatically deploys the JPetStore application if it is running.
5. Edit the file
webapps/jpetstore/WEB-INF/classes/properties/database.properties and
change the default values to the corresponding configurations in the environment:
Driver=org.gjt.mm.mysql.Driver
Url=jdbc:mysql://<YOUR_MYSQL_SERVER>:3306/JPETSTORE
Username=jpetstore
Password=ibatis9977
20
