


IU 661 / 0047 17 TowerFeed
TM
for the HP LaserJet 8150/8100/8000
APPENDIX B - Tips & Hints
Creating PAPER SEQUENCES for a Word Document
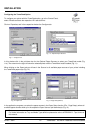
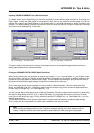
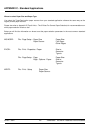
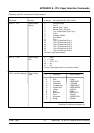
It is widely known that in Page Setup you have the possibility to enter different paper sources for First Page and
Other Pages. If there are other pages in the document, which have to be printed on another paper, this can be
defined in the same Page Setup window. In this window there is a pull-down bar Apply to: which is used for that
purpose. The default setting is Whole Document but there are also the options This point forward and Selected
text, which can be selected (Fig. 18 and 18a).
The option Apply to: allows to force a change of the paper source or from a specific page onwards and thus to
define paper sequences for a whole document.
Printing a DOCUMENT WITH COPIES (Multi-Part-Form)
When printing a document you get either an original copy (copies = 1), or, if you set copies = n, you will get n times
the same printout. Usually you want the original document to distinguish from its copies. An elegant method for that
purpose is to print the copies on different (color) paper. This can be done by sending the print job several times to
the printer but with different page settings. Using a Macro makes this an easy task.
On the next page you will find an example of a macro used for a Word document. The macro starts with 'Sub
Macro' and ends with 'End Sub'. It consists of several sections (one per copy) which contain the paper definitions
for each copy (FirstPageTray = xx; OtherPagesTray = yy).
You can use the Macro Recording function of Word (Extra-Macro-Record) to produce the first section by performing
the steps for Page Setup and Print. Then, in Macro Edit mode, you copy/paste this section to have one for each
copy to print (one section per copy). Finally you edit the entries in FirstPageTray = xx; OtherPagesTray = yy to the
desired paper sources.
This will produce a macro, which prints the document in multiple copies and with the respective page settings.
Such a macro can be incorporated into a Menu item or added as icon into the Toolbar.
Hint:
When creating and adding a Macro to the Toolbar for automatic printing of the final document with its
copies, it might be useful to also create and add a second Macro for draft printing on cheap paper.
Fig. 18 Page Setup – This point forward Fig. 18a Page Setup – Selected text