


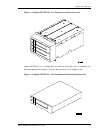


StorageWorks 8505 8mm Cartridge Tape Drive
3–4 Order Number: EK–STWCT–UG. E01
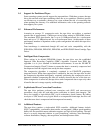
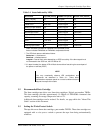
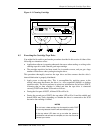
Before loading a data cartridge into the drive, ensure that the write-protect switch is set
correctly for the desired operation. You can use a ball-point pen or similar instrument to
set the write-protect switch.
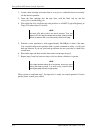
• To write protect the data cartridge, move the write-protect switch away from the
edge of the data cartridge, as shown in Figure 3–3. If the red tab is visible, the
cartridge is write-protected and cannot be written to or erased.
• To write enable the data cartridge, move the write-protect switch toward the edge of
the data cartridge, as shown in Figure 3–3. If only the edge of the red tab is visible,
the data cartridge is write-enabled and can be written to or erased.
Figure 3–3 Write-Protect Switch on 8mm Data Cartridge
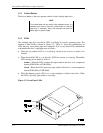
3.4 Loading a Data Cartridge
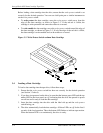
To load a data cartridge into the tape drive, follow these steps:
1. Ensure that the write protect switch has been set correctly for the desired operation
(see Section 3.3 above).
2. If you have just powered on the drive, be sure that the bottom green LED and the top
amber LED on the front panel are off, indicating that the drive has passed its power
on self-test and is ready to load the data cartridge.
3. Insert the data cartridge into the drive with the label side up and the write-protect
switch facing you.
4. The drive automatically loads the data cartridge. All three LEDs are off for the first 8
seconds of the load operation. Then, the bottom LED flashes to indicate tape motion.
When the bottom LED is on continuously, the drive is ready.