


INSTALLATION
HP T750 G2, HP T750J, HP T1000 G3, HP T1000J, HP T1500 G3, and HP T1500J UPS Models User Guide S 505922-002
6
Installing the UPS
NOTE: Do not make unauthorized changes to the UPS or accessories; otherwise, damage
may occur to your equipment and void your warranty.
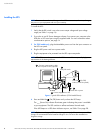
To install the UPS:
1 Verify that the DIP switch is set to the correct output voltage and input voltage
range (see Table 1 on page 14).
2 If you plan to use HP Power Manager software, first connect your computer to the
USB port or UPS serial port using the supplied cable. For more information about
communication options, see page 14.
3 For 230V models only, plug the detachable power cord into the input connector on
the UPS rear panel.
4 Plug the UPS power cord into a power outlet.
5 Plug the equipment to be protected into the UPS output receptacles.
NOTE: DO NOT connect laser printers to the UPS because of the exceptionally high power
requirements of the heating elements.
Press the (On/Off)
button (on the front panel)
2
Connect communication cable
from computer to UPS (optional)
Connect UPS to power
3
&
4
5
Connect equipment to UPS
6
1
Verify DIP switch
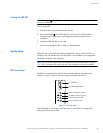
Figure 6 Typical UPS Installation (120V Model Shown)
6 Press and hold the (On/Off) button until you hear the UPS beep.
The
(Power On) indicator illuminates green indicating that power is available
to your equipment. The UPS conducts a self‐test and enters Normal mode.
If the UPS beeps or a UPS alarm indicator stays on, see Table 10 on page 28.
NOTE: The batteries charge to 90% capacity in approximately 3 hours. However, to fully
charge, HP recommends that the batteries charge for 6 to 24 hours after installation or
long-term storage.