


Chapter 1 Introduction
6
CAUTION After the system information update, your NetServer will
revert to the default NetRAID settings. You must restore your
NetRAID configuration from your worksheets or from notes
before you can access the NetRAID arrays. If you do not save
the NetRAID configuration details before performing the
system information update, your data may be unrecoverable.
Briefly, the conversion takes several steps:
1. Back up the contents of your hard disks - both the system disk(s) and any
RAID arrays.
2. Save the current system software configuration with the LH 3/LH 3r
HP NetServer Navigator CD-ROM.
3. Gather the documentation, tools, hardware, and software needed to perform
the conversion.
4. Perform the first part of the software upgrade, backing up data.
5. If you are upgrading an LH 3r, extend it from the rack. Be sure to extend
the anti-tip foot, or use the anti-tip feature, before you extend the NetServer
from the rack.
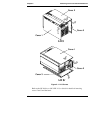
6. Remove cover 2, the cover protecting the top of the CPU baseboard, and
cover 3, the cover shielding the components on the CPU baseboard side of
the LH 3.
7. Remove the LH 3 CPU baseboard.
8. Install the power supply upgrade kit, or additional power supplies, if
necessary.
9. Remove the CPU card guide and air baffle used with the old CPU
baseboard.
10. Install memory and processors in the LH 4 CPU baseboard.
11. Install the chassis reinforcement bars.
12. Install the LH 4 CPU baseboard in the chassis.
13. Replace the covers.
14. Perform the second part of the software update from the HP NetServer
Navigator CD-ROM and LH4UPD diskette.