


Chapter 3 Installing LH 4 Components
26
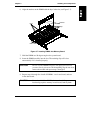
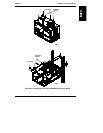
3. As the CPU baseboard lowers into place, raise the levers into a vertical
position. When the CPU baseboard seats in its slot, push the levers flat to
lock the CPU baseboard into position.
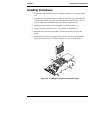
4. Attach the two Torx thumbscrews to secure the CPU baseboard to the
chassis, as shown in Figure 3-9.
5. Insert the new technical reference card in the sleeve on the inside of the
NetServer cover, then replace the covers on the NetServer.
Installing a Redundant Power Supply
The LH 3/LH 3r runs on two power supply modules, and can accept a third to
assure power continuity if a single power supply fails. The LH 4/LH 4r needs three
power supply modules and can accept a fourth to assure power continuity if a
single power supply fails.
If your LH 3/LH 3r does not already have a second power supply cage and
redundant power supply, install the Power Supply Upgrade Kit. If you require
power supply redundancy, order a fourth power supply module. To install the
power supply hardware, refer to the instructions supplied with the kits.
Installing a Redundant Fan
The Power Supply Upgrade Kit contains an extra fan to provide extra cooling and
redundancy for power supply cooling. If you install the power supply upgrade,
install the redundant fan according to the installation directions.
Installing the LH 4r in the Rack
If you removed the LH 3r to upgrade it, refer to the documentation listed below to
install the LH 4r in the rack.
For HP Racks
Refer to the HP NetServer LH 3/LH 3r User Guide. For cabling instructions, refer
to the documentation that came with the rack, and to the Rack Cabling Reference
for the HP NetServer LH 3.
For Non-HP (Compaq) Racks
Refer to the HP NetServer LH 3 Non-HP Rack Installation Guide. For cabling
instructions, refer to the documentation that came with the rack, and to the Rack
Cabling Reference for the HP NetServer LH 3.