


Daytona Twin Tec LLC, 933 Beville Road, Suite 101-H, S. Daytona, FL 32119 TCFI Log
(386) 304-0700 www.daytona-twintec.com
3/2007
Page 7
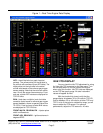
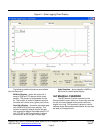
Figure 4 - Operating Statistics Histogram Chart
Historical diagnostic codes are only applicable to
TCFI Gen II units and TCFI units with Rev 6.0 or higher
firmware. Any historical diagnostic codes logged by the
TCFI unit are listed along with the number of trips
(engine start cycles) since the individual code was last
logged. Codes are automatically cleared after 50 trips.
Customers are often confused about the
meaning of the term “trips.” This is an industry
standard terminology. If a code shows 40 trips, it
means that the code was set 40 engine start cycles
ago, not that the code has been set 40 times.
Refer to the TCFI instructions for further
information about diagnostic codes. You can clear
historical diagnostic codes by using the Clear Historical
Diagnostic Codes command from the Communications
menu.
The elapsed time data in the various RPM
bands can be displayed in the form of a histogram
chart by clicking on the Histogram button. Color coding
of the bars helps to interpret the data. The idle RPM
band is blue, normal operating RPM bands are green
and high RPM bands are yellow and red. The chart is
automatically scaled for best display. You can print the
chart along with a complete statistics report by clicking
on the Print Chart button.
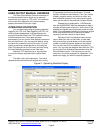
IMPORTING DATA INTO EXCEL
Data files saved from TCFI Log are in comma
delimited ASCII format. You can easily import a data
file into other programs such as Microsoft Excel for
further analysis. You can also view data files with a text
editor such as Windows WordPad. To import a data file
into Excel:
1. Start Excel. In the File Open dialog box, select
Files of type: All Files (*.*). Then browse for the
data file.
2. The Text Import Wizard appears. For step 1, select
delimited file type. For step 2, select comma
delimiter. For step 3, select general column data
format. Then click on Finish.
3. You can then format the data and save the
spreadsheet as an Excel file.