


Maintenance 30
2.
Power down the UPS ("Powering down the UPS" on page 24).
3. Unplug the UPS power cord.
4. Disconnect the communications cable.
5. Unplug the load devices.
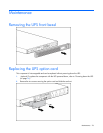
6. Remove the UPS front bezel ("Removing the UPS front bezel" on page 26).
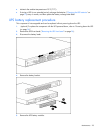
7. Remove the UPS battery bracket.
8. Remove the UPS battery modules.
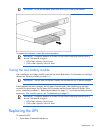
9. Remove the screws securing the UPS to the rack.
10. Remove the UPS from the rack.
To replace the component, reverse the removal procedure.
Updating the UPS firmware
To update the UPS firmware, see the HP website (http://www.hp.com/go/rackandpower).
Configuring a USB to serial converter
NOTE: This procedure was tested on the Windows
®
XP Professional and Windows Server
®
2003 operating systems using the HP USB to serial converter (part number 304098-001).
Depending on your system configuration, a driver download might be required to successfully
install the converter. The driver can be downloaded from the USB-Drivers website
(http://www.usb-drivers.com/drivers/123/123294.htm
).
To configure a USB port to the COM 1 port on systems that do not have available serial ports:
1. Connect the USB to serial converter to the USB port on your system.
2. Click Start, select Control Panel, and then double-click System.
The System Properties screen appears.
3. Click the Hardware tab.
4. Click Device Manager.
The Device Manager screen appears.
5. In the tree displayed in the left panel, click the Ports (COM & LPT) branch to expand.
6. Double-click the port that is assigned to your USB to serial converter device. This port is usually
named with the device manufacturer's name followed by "USB to Serial Bridge (com 4)."
The Port Properties screen appears.
7. Click the Port Settings tab.
The Port Settings screen appears.
8. Click Restore Defaults.
The following default settings appear:
o Bits per second: 9600
o Data Bits: 8
o Parity: None
o Stop bits: 1