


29
Optimizing computer images
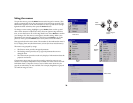
After your computer is connected properly and the computer’s image is on
the screen, you can optimize the image using the onscreen menus. For gen-
eral information on using the menus, see page 30.
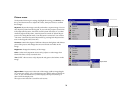
• Adjust the Keystone, Contrast, or Brightness in the Picture menu.
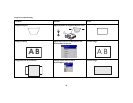
• Change the Aspect Ratio. See page 31 for details.
• Adjust the Color Space, Temperature or Control in the Advanced
menu.
• Adjust the Phase, Tracking, or Horizontal or Vertical position in the
Advanced menu.
• Once you have optimized the image for a particular source, you can
save the settings using Presets. This allows you to quickly recall these
settings later. See page 32.
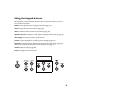
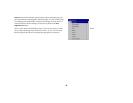
Presentation features
Several features are provided to make giving presentations easier. The fol-
lowing is an overview, details are found in the menu section on page 30.
•The remote’s Effect button allows you to assign various features to the
key. The default effect is About. You can select from Blank, Mute,
Aspect Ratio, Source, Auto Image, Freeze, About, and LitePort Rotate.
See page 38 for details.
• The Freeze effect allows you to freeze the displayed image. This is use-
ful if you want to make changes on your computer without your audi-
ence seeing them.
•The Blank button on the remote allows you to display a blank screen
instead of the active source. See page 37.
• The Startup Logo menu option lets you change the default startup
screen to a black, white, or blue screen. See page 37.
• Two menu options, Power Save and Screen Save, are provided to auto-
matically shut down the projector after several minutes of inactivity or
display a blank screen. This helps preserve lamp life. See page 35.
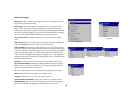
Optimizing video images
After the video device is connected properly and the image is on the screen,
you can optimize the image using the onscreen menus. For general informa-
tion on using the menus, see page 30.
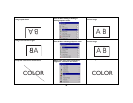
• Adjust the Keystone, Contrast, Brightness, Color, or Tint in the Picture
menu. See page 31.
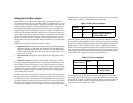
• Change the Aspect ratio. Aspect ratio is the ratio of the image width to
image height. TV screens are usually 1.33:1, also known as 4:3. HDTV
and most DVDs are 1.78:1, or 16:9. Choose the option that best fits your
input source. See page 31.
• Select a Sharpness, Color Temperature, or Video Standard setting. See
page 33.
• Adjust the Color Control or White Peaking settings. See page 33.
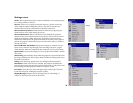
Customizing the projector
You can customize the projector for your specific setup and needs. See
page 34 to page 39 for details on these features.
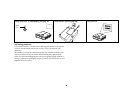
• For rear projection, turn Rear mode on in the Settings>System menu.
• For ceiling mounted projection, turn Ceiling mode on in the Set-
tings>System menu.
• Turn on Automatic Keystone adjustments.
• Specify which source the projector checks first for active video during
power-up.
• Specify the function of the Effect Key on the remote.
• Turn the projector’s display messages on and off.
• Turn on power saving features.
• Specify blank screen colors and startup logos.
• Specify the menu language.
• Project wirelessly with LiteShow wireless adapter. See page 6.
• Control your projector using RS-232 commands. See page 8.