25
Using the remote control
The remote uses two (2) provided AAA batteries. They are easily installed
by sliding the cover off the remote’s back, aligning the + and - ends of the
batteries, sliding them into place, and then replacing the cover.
Caution: When replacing the batteries, be aware that using batteries other
than the type provided with the projector may risk severe damage to the
remote. When disposing of the batteries, be sure to do so in an environmen-
tally proper manner.
To operate, point the remote at the projection screen or at the projector (not
at the computer). The range of optimum operation is about 15 feet (4.5m).
Pressing the remote’s Power button when the projector’s Power toggle
switch is in the Off position does not cause the projector to power up. You
need to put the projector’s Power toggle switch in the On position to let the
remote power on the projector.
When the projector is running, you can press the remote’s Power button to
place the projector in the Off state (see page 17 for shutdown info) and
power it off.
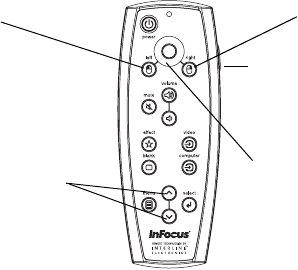
Left and right remote mouse buttons are used to mimic the actions of the
left/right mouse buttons on your computer. Mouse cursor movement is
managed via the remote’s Cursor control. Connect a USB cable to the USB
connector on the computer and to the projector to use these buttons and
control your computer’s mouse. When you do this for the first time, the
Add New Hardware wizard may appear. See page 10 for details on loading
the correct USB drivers.
Press the remote’s Menu button to open the projector’s menu system. Use
the arrow buttons to navigate, and the Select button to select features and
adjust values in the menus. See page 29 for more info on the menus.
The remote also has Volume and Mute buttons to control the sound, a back-
light button to light the remote’s buttons in the dark, and Video and Com-
puter buttons to switch between sources.
Two presentation-specific features are also provided. Use the Blank button
to display a blank screen instead of the current slide (you can choose which
color is displayed, see page 34); use the Effect button to invoke a user-defin-
able action, such as freeze, zoom or change your aspect ratio for viewing
DVDs (see page 34 to learn to program this button).
If you are displaying presentations in Microsoft
®
PowerPoint
®
, you can use
the remote’s mouse buttons to navigate through your presentation while in
Slide Show mode. To configure PowerPoint for this, choose Options from
the PowerPoint Tools menu, click the View tab, de-select the Popup Menu
on Right Mouse Click option in the Slide Show section, then click OK. After
that, when you’re in PowerPoint’s Slide Show mode, a left click advances to
the next slide and a right click returns to the previous slide (other Power-
Point modes are not affected).
Troubleshooting the remote
• Make sure the batteries are installed in the proper orientation and are
not dead.
• Make sure you’re pointing the remote at the projector or the screen, not
the computer, and are within the remote range of 15 feet (4.5m). For
best results, point the remote at the screen.
• If you are trying to control your computer’s mouse, make sure the USB
cable is connected. If using a USB cable, make sure the correct drivers
are installed.
navigation
buttons
left mouse button
right mouse button
backlight button
cursor control
