


Intel Desktop Boards D815EEA2, D815EPEA2, D815EFV, and D815EPFV Product Guide
32
Installing and Removing a GPA Card (D815EEA2 and
D815EFV only)
CAUTION
Remove the GPA video card before installing or upgrading memory to avoid interference with the
memory retention mechanism.
CAUTION
Damage can occur to the pins of the AGP universal connector if the GPA card’s edge plug is not
positioned squarely over the AGP connector before inserting.
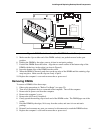
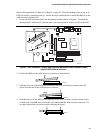
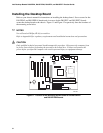
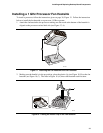
Using Figure 9 as a reference, follow these steps to install a GPA card:
1. Position the GPA card over the AGP universal connector so that the arrow (A) on the GPA
card points toward the back panel I/O of the computer. Hook the notch (B) on the back of the
GPA card over the back of the AGP universal connector’s retention mechanism (RM).
2. Push the card in direction (C) while lowering (but not inserting) the card in direction (D).
Note: The GPA card will tend to slip forward out of position unless pressure is maintained in
direction (C) as the card is lowered.
3. Before inserting the GPA card, verify that both ends of the card’s edge plug align squarely
over the AGP universal connector (E).
4. Press down on both ends of the card in direction (F) until it is inserted completely in the AGP
universal connector and the RM’s retention notch snaps into place.
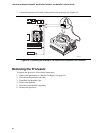
To remove the GPA card, push the RM’s release lever in direction (G) to release the card. Lift the
card out of the AGP universal connector tilting in direction (C) and unhook it from the back of the
RM (B).
OM10410
A
F
G
D
B
F
C
E
Figure 9. Installing and Removing a GPA Card